Small world, when I worked at Heathrow prior to joining the mob, I lodged in a council house in Whitton.
Great work on the Rebecca unit Graham, it was a very useful gimmick in its day.
A-W Meteor NF.14 WS788 Restoration Project
-
PeterVerney
- Posts: 9
- Joined: Tue 07 Jan 2020, 8:05 pm

Re: A-W Meteor NF.14 WS788 Restoration Project
...and I wondered who it might be...?!


Small world indeed Peter. I guess Rebecca was no better or worse than any other bit of electronics of it's time?
Meteor WS788/ Chippy WK640 Restoration Project, YAM
Shack WR963, Coventry
Other types meddled with by request!
Shack WR963, Coventry
Other types meddled with by request!

Re: A-W Meteor NF.14 WS788 Restoration Project
Good work on the Models and the Rebecca Unit Blue.
I’m looking for a set of all three levers that made up the “throttle Quadrant” - if you can call sliding levers a Quadrant, and I was wondering if you had any spare from your parts bin? I’d be happy to make a donation to ‘788’s kitty to help pay for any paint / parts / Jaffa cakes etc!
Rob
I’m looking for a set of all three levers that made up the “throttle Quadrant” - if you can call sliding levers a Quadrant, and I was wondering if you had any spare from your parts bin? I’d be happy to make a donation to ‘788’s kitty to help pay for any paint / parts / Jaffa cakes etc!
Rob
Re: A-W Meteor NF.14 WS788 Restoration Project
I'm guessing you mean the 2 throttle levers and the airbrake control Rob? I have nil spares on that score I'm afraid.
Option 1, you ask Bruce nicely, knowing just how much stuff he has it's not beyond the realms of possibility he has a set or 50!
Option 2, I'm going to have to remove, strip and restore ours at some point fairly soon. If you can wait till then I can measure and record everything for you, and you can set about scratch building a set.
I do have spare HP/LP cock sets...
Meteor WS788/ Chippy WK640 Restoration Project, YAM
Shack WR963, Coventry
Other types meddled with by request!
Shack WR963, Coventry
Other types meddled with by request!
Re: A-W Meteor NF.14 WS788 Restoration Project
Yep that’s the kiddies. I have a faceplate so looking for just the levers. Will ask Bruce again and see if the Meteor shop has any originals in stock.
Rob
Rob
Re: A-W Meteor NF.14 WS788 Restoration Project
Bruce is always well worth an ask. If he hasn't got it, it doesn't exist!
29/05/2020 Update
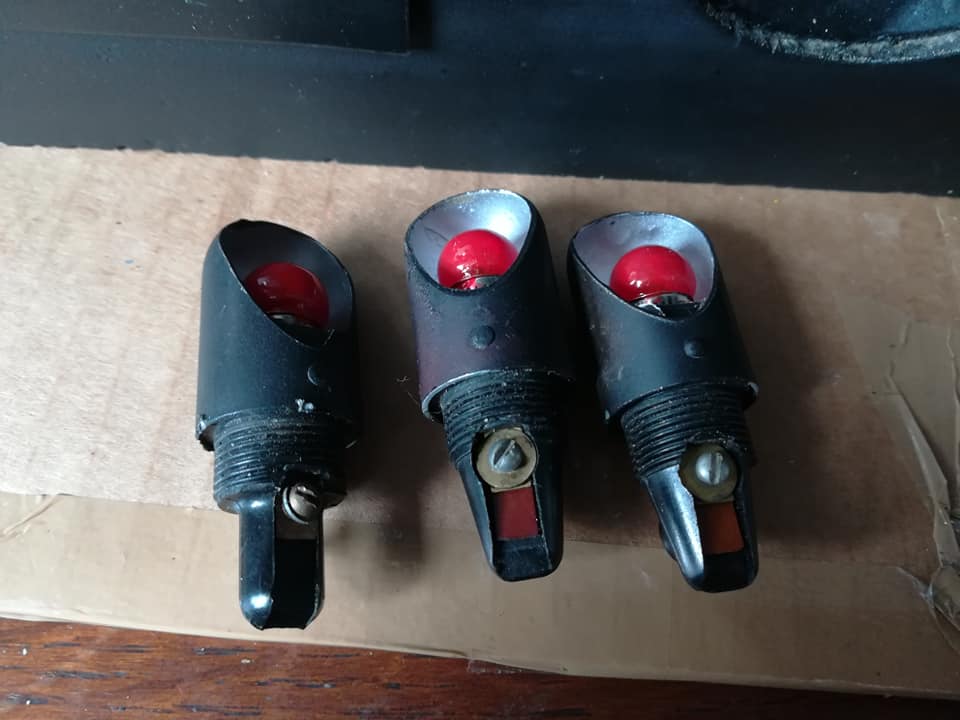
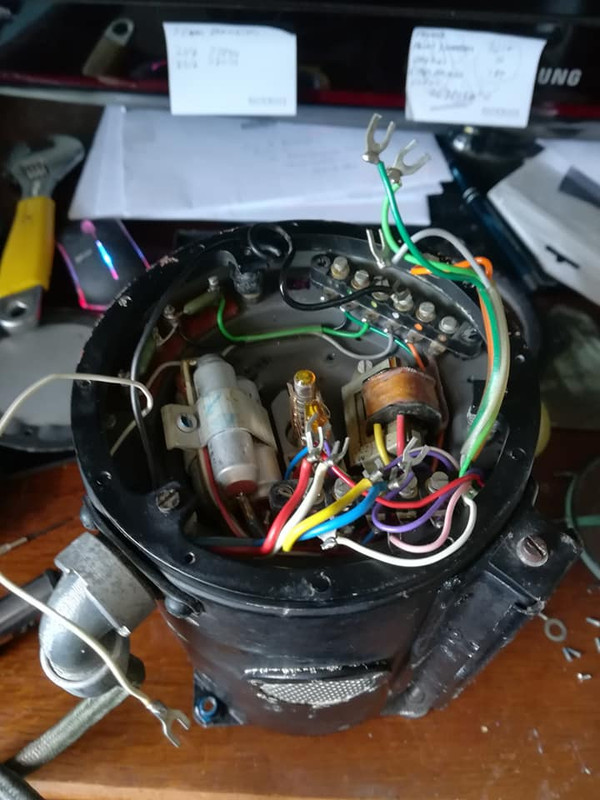
Yep, I've got some more real bits of 788 undergoing a bit of treatment. Yesterday it was the turn of the tail mounted nav light. You may recall I stripped this and after a lot of work to straighten it out repainted it a while ago. Well... I needed a light fitting in a hurry so I nicked the guts out of it, knowing I had a spare bulb holder kicking around. Yesterday the bulb holder was extracted from its previous home and prepared to become part of a Meteor NF.
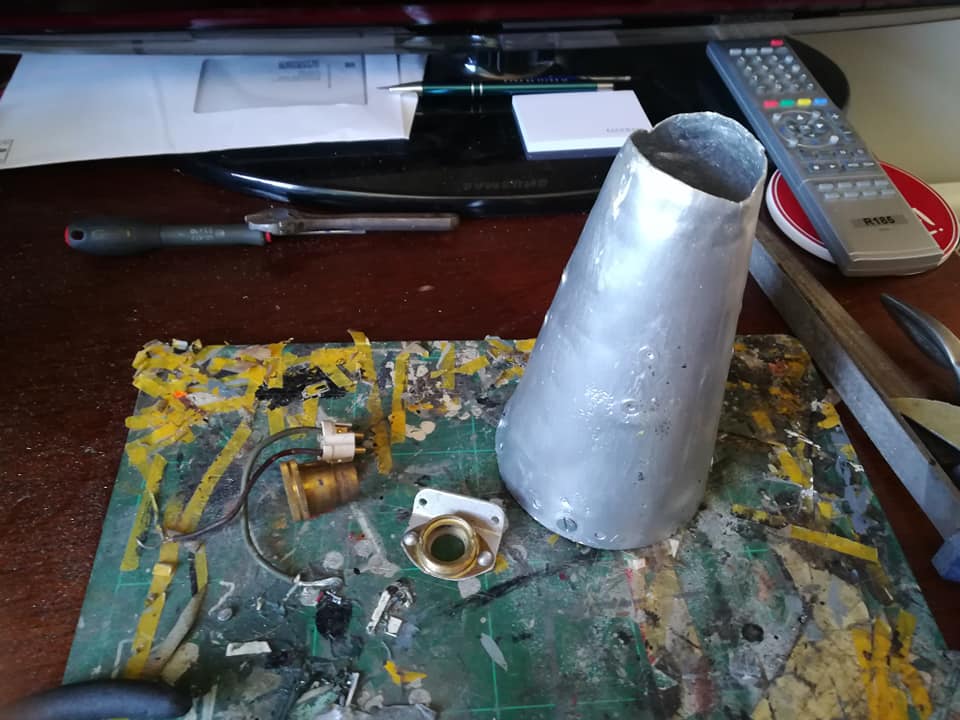
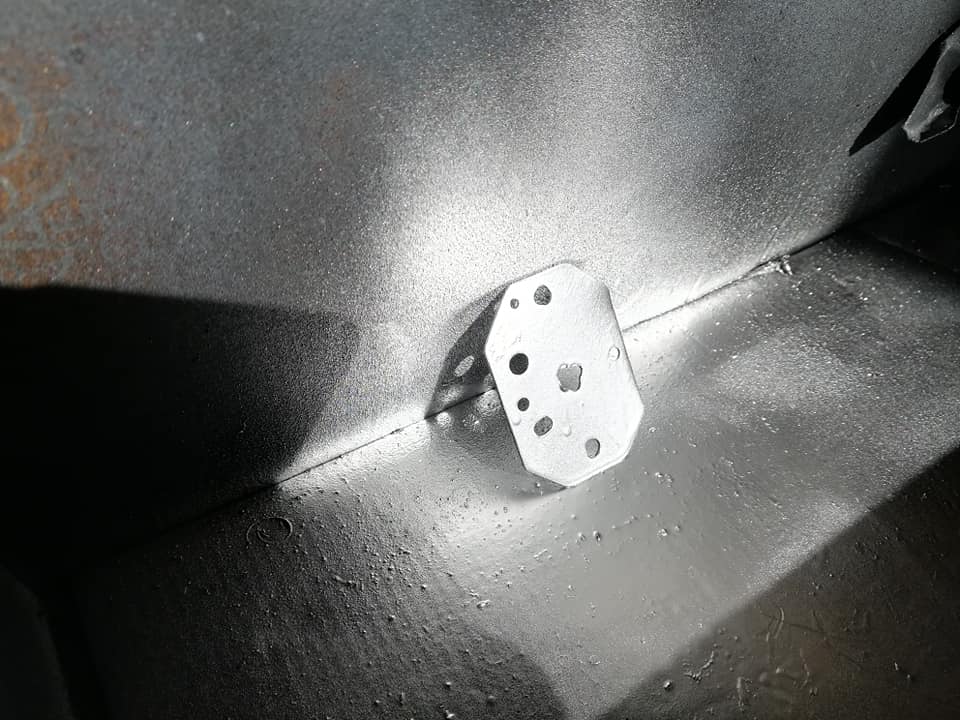
So the bulb holder was removed from its little bracket, and I made a new one to fit it within the fairing. Here, the dry run of test fitting the bulb holder...
Satisfied, it was prepped, primed and painted silver
And after drying, a new grommet and wires were fitted and it was reassembled
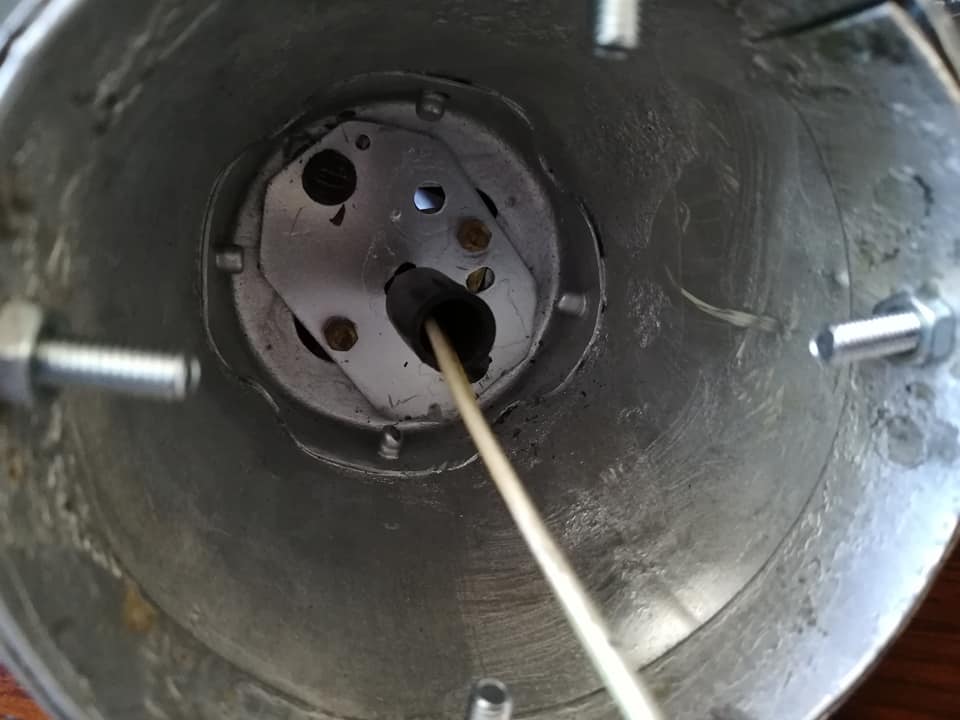
Just add bulb!
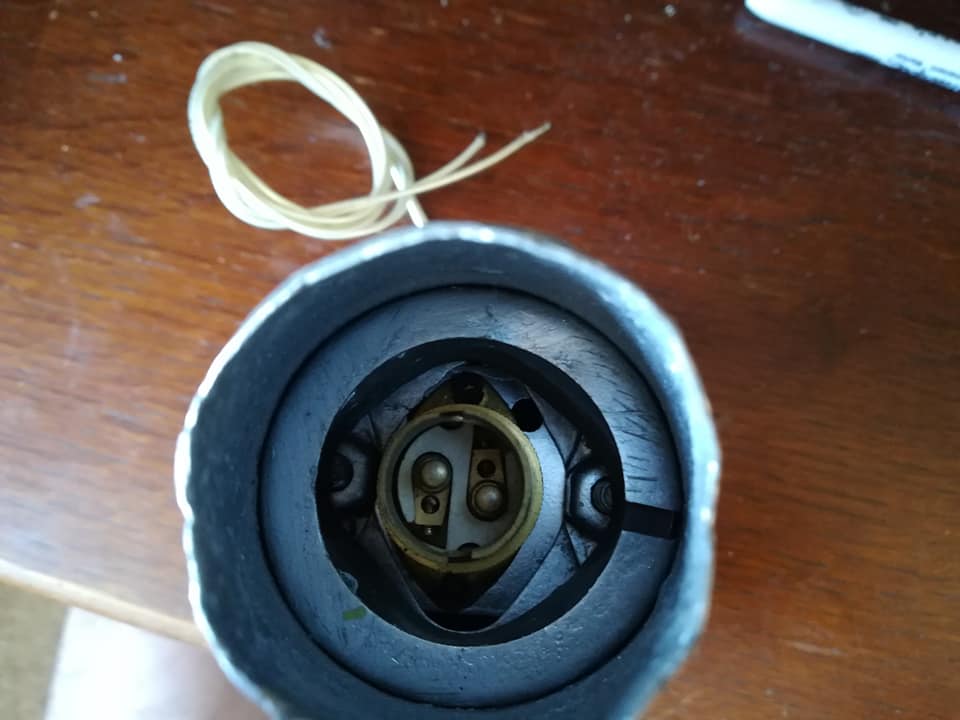
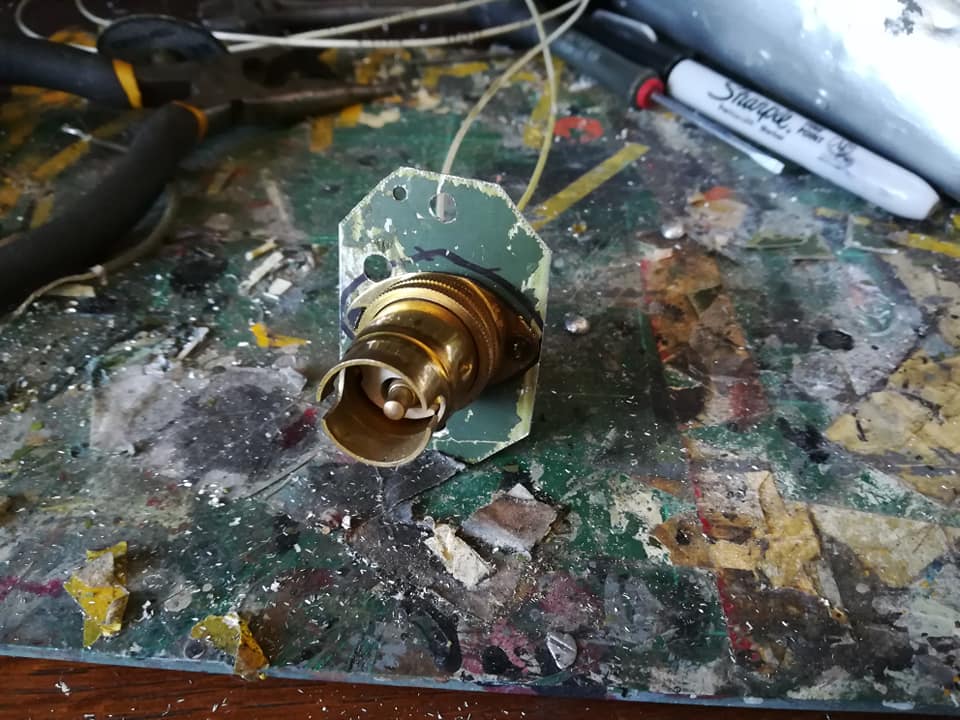
The bulb holder's previous home was this internal light fitting
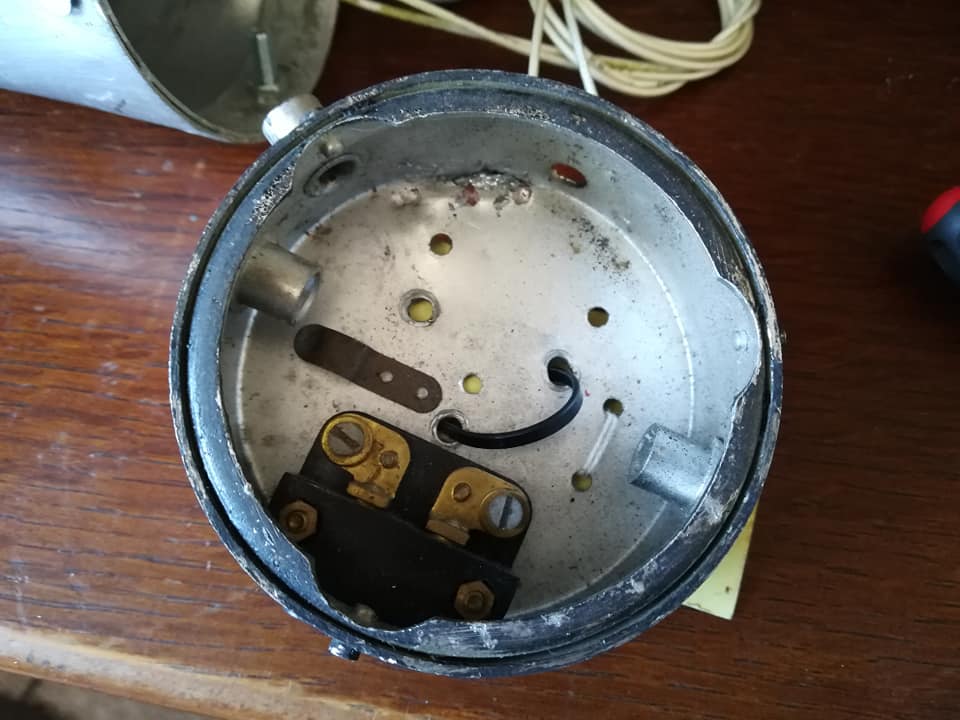
During one of YAM's periodic chucking out sessions under the previous leadership this was skipped as it was missing the switch, the bezel and the glass. I un-skipped it, as we see useful where others don't necessarily, and it has paid off. The label shows a link to our Halifax; it was salvaged from Hastings TG536, the Hastings which gave up its centre section and other vitals for our Halifax
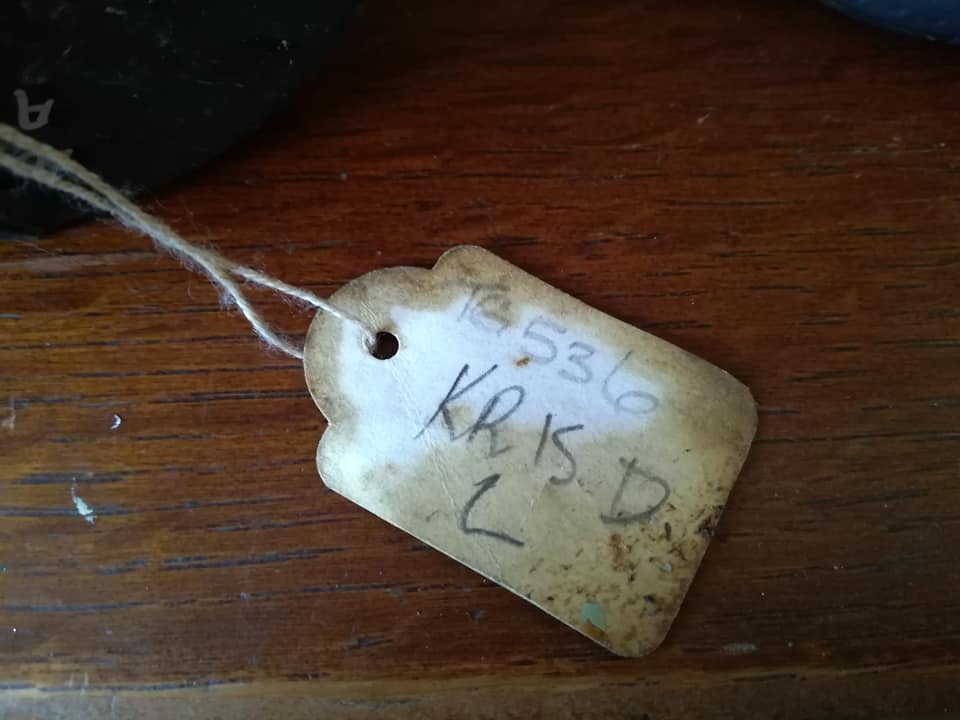
Decades on, still providing useful parts!
I know it's well stripped, but if that light fitting casing off the Hastings is of any use to anyone, just give me a shout...
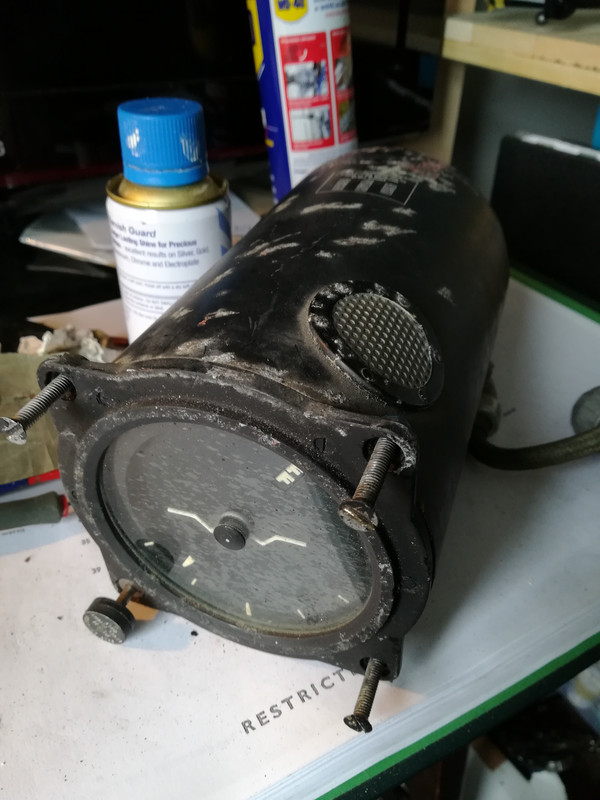
Next on the bench will be the Rebecca scope, it needs a bit of love and a repaint. We are working with Replitek to try and devise a way to make its display look like it is a fully functioning Rebecca unit; that'll be quite cool!
29/05/2020 Update
Yep, I've got some more real bits of 788 undergoing a bit of treatment. Yesterday it was the turn of the tail mounted nav light. You may recall I stripped this and after a lot of work to straighten it out repainted it a while ago. Well... I needed a light fitting in a hurry so I nicked the guts out of it, knowing I had a spare bulb holder kicking around. Yesterday the bulb holder was extracted from its previous home and prepared to become part of a Meteor NF.
So the bulb holder was removed from its little bracket, and I made a new one to fit it within the fairing. Here, the dry run of test fitting the bulb holder...
Satisfied, it was prepped, primed and painted silver
And after drying, a new grommet and wires were fitted and it was reassembled
Just add bulb!
The bulb holder's previous home was this internal light fitting
During one of YAM's periodic chucking out sessions under the previous leadership this was skipped as it was missing the switch, the bezel and the glass. I un-skipped it, as we see useful where others don't necessarily, and it has paid off. The label shows a link to our Halifax; it was salvaged from Hastings TG536, the Hastings which gave up its centre section and other vitals for our Halifax
Decades on, still providing useful parts!
I know it's well stripped, but if that light fitting casing off the Hastings is of any use to anyone, just give me a shout...
Next on the bench will be the Rebecca scope, it needs a bit of love and a repaint. We are working with Replitek to try and devise a way to make its display look like it is a fully functioning Rebecca unit; that'll be quite cool!
Meteor WS788/ Chippy WK640 Restoration Project, YAM
Shack WR963, Coventry
Other types meddled with by request!
Shack WR963, Coventry
Other types meddled with by request!
Re: A-W Meteor NF.14 WS788 Restoration Project
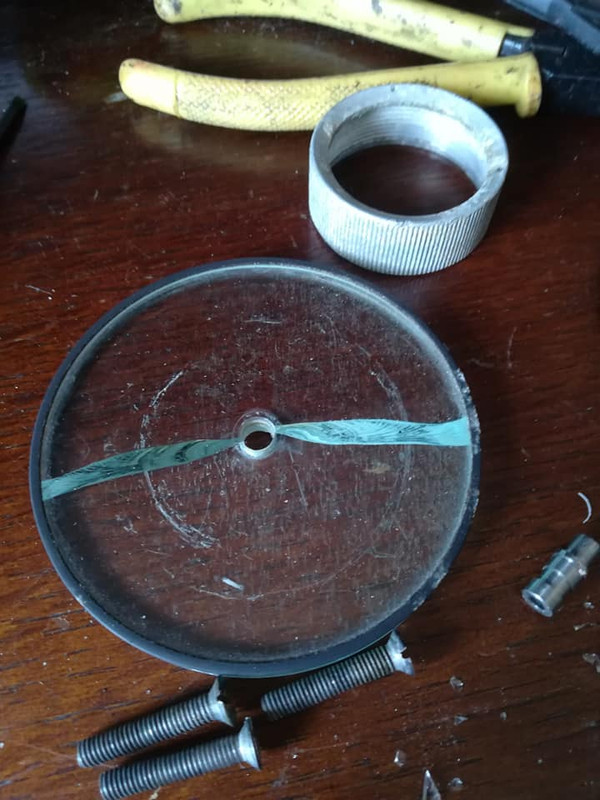
Small, little, tiny 30/05/2020 update for you! Yesterday I was stuck in most of the day while the nice Mr. Openreach man sorted out whatever asshattery was going on with my phone line. It wasn't a wasted day though; I stripped down and repainted the Rebecca scope for 788.
Work in progress...
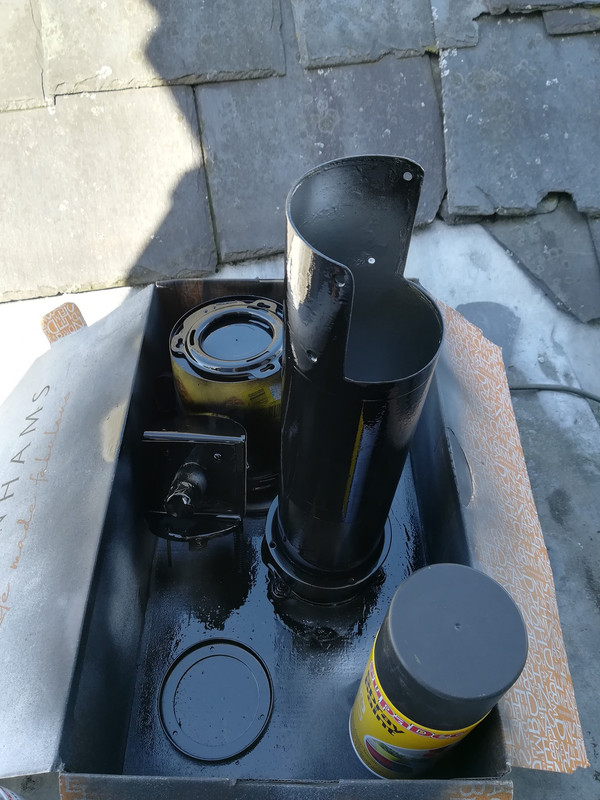
...and done!
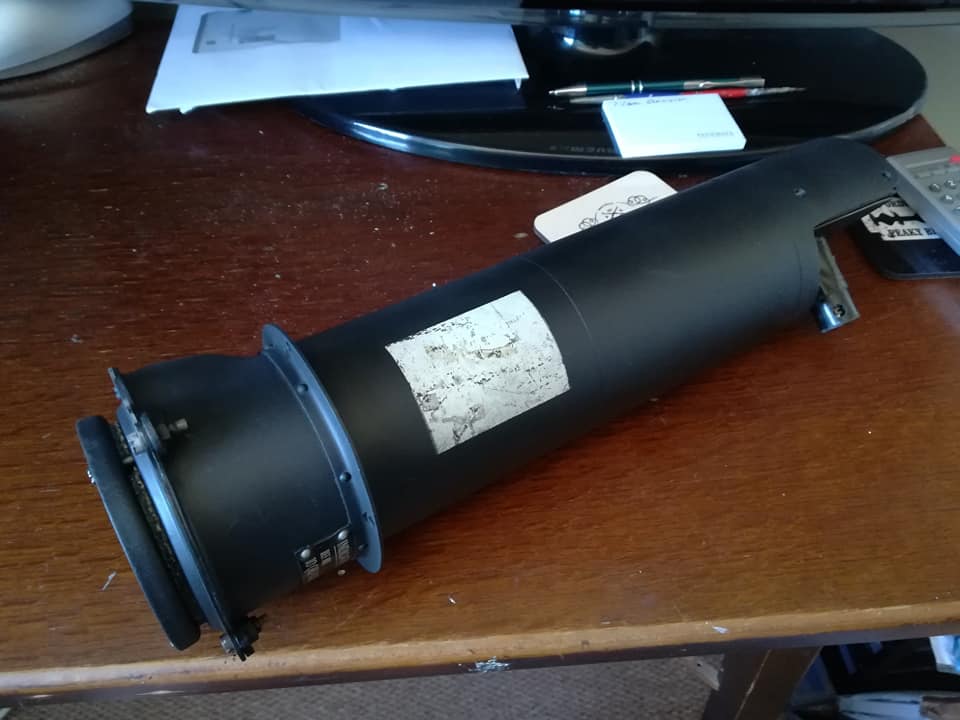
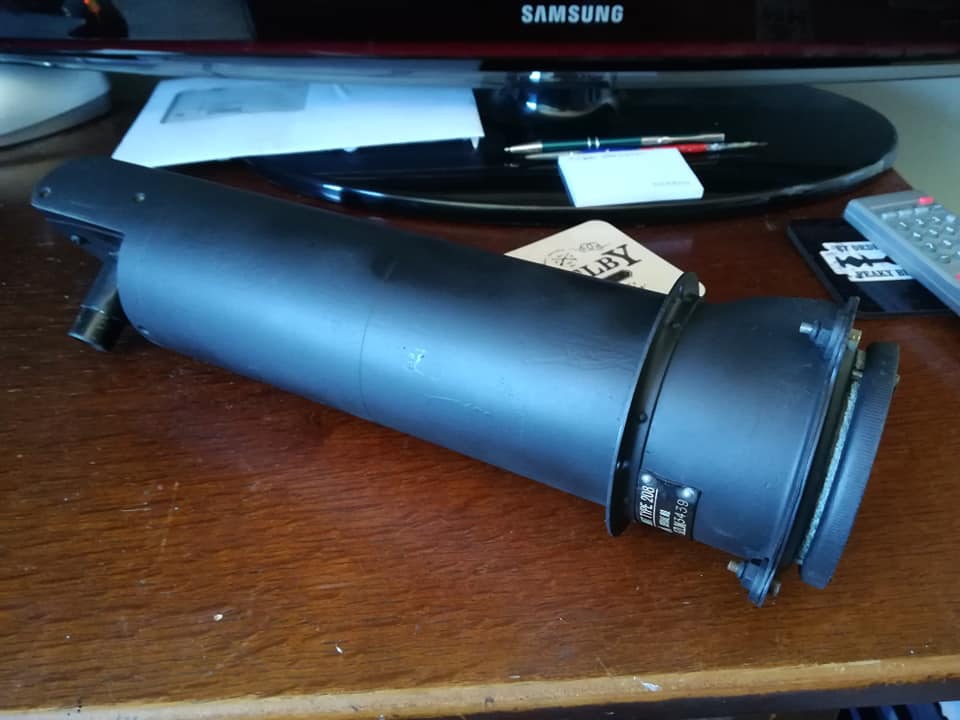
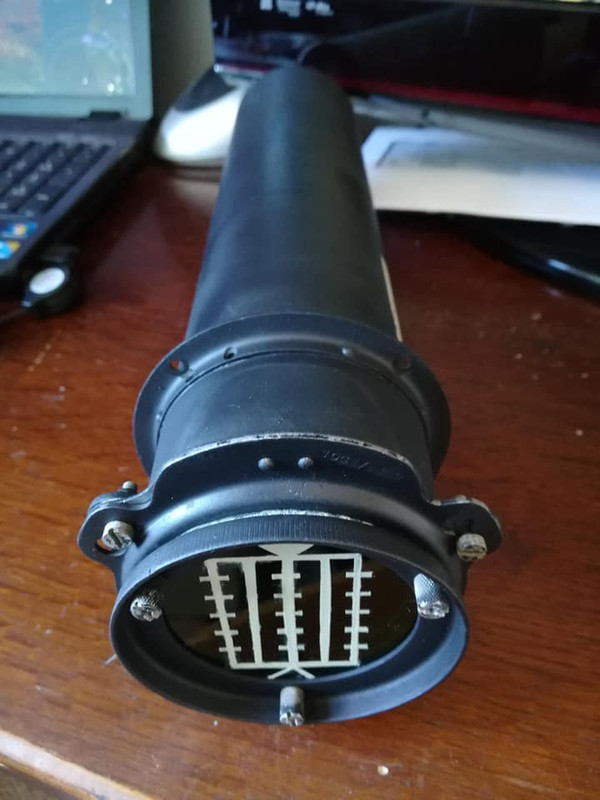
As mentioned, Nigel at Replitek is working on a little device to fit within this unit to make it look on the display like an actual working Rebecca unit. He has an identical one for his Canberra T.4 cockpit project, and what started out as a daft idea he is taking and running with! It just goes to show, you can bring to fruition some pretty cool ideas when you work constructively with other people and embrace modern technology.
Work in progress...
...and done!
As mentioned, Nigel at Replitek is working on a little device to fit within this unit to make it look on the display like an actual working Rebecca unit. He has an identical one for his Canberra T.4 cockpit project, and what started out as a daft idea he is taking and running with! It just goes to show, you can bring to fruition some pretty cool ideas when you work constructively with other people and embrace modern technology.
Meteor WS788/ Chippy WK640 Restoration Project, YAM
Shack WR963, Coventry
Other types meddled with by request!
Shack WR963, Coventry
Other types meddled with by request!
Re: A-W Meteor NF.14 WS788 Restoration Project
03/06/2020 Update
I'm claiming this as an actual update, because it involves a bit of the Meteor. It also includes more than a smidge of Westland Dragonfly, and even a pinch of Sea King!
First the token Meteor offering. Yes, I've found and fitted a bulb for the tail light I rebuilt last week or whenever it was. You lose track...
You wouldn't miss that bugger on a dark night! And apart from the fact that the radio racks out of the back of the jet are currently with Simon and getting a restoration, repaint, and new shock mounts, that's it for 788 for now as I still haven't had the instrument panel retrieved and sent my way for rectification
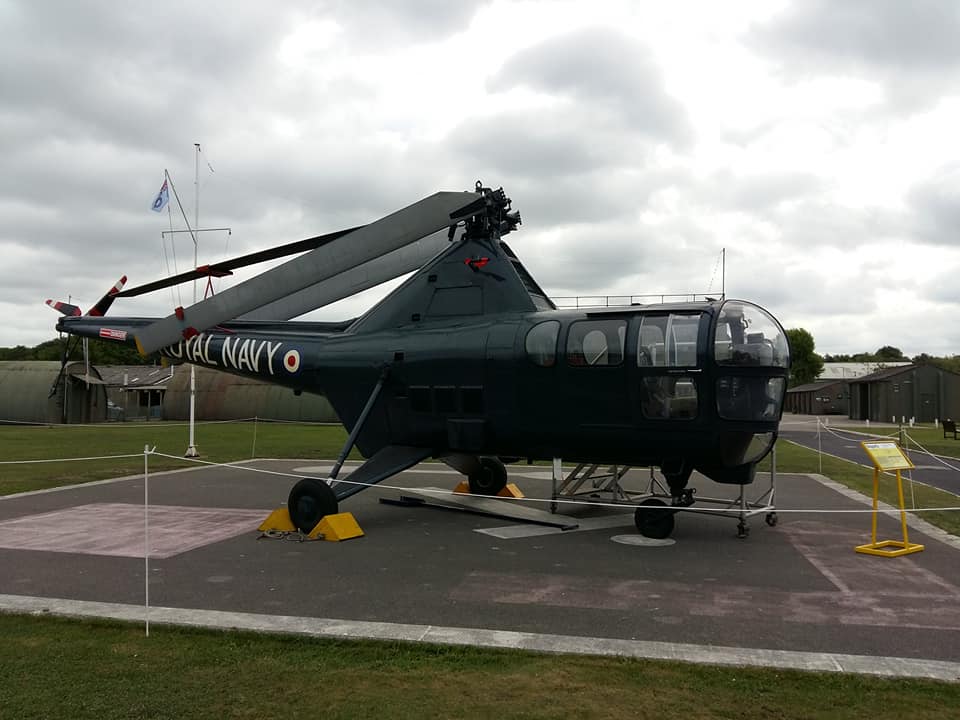
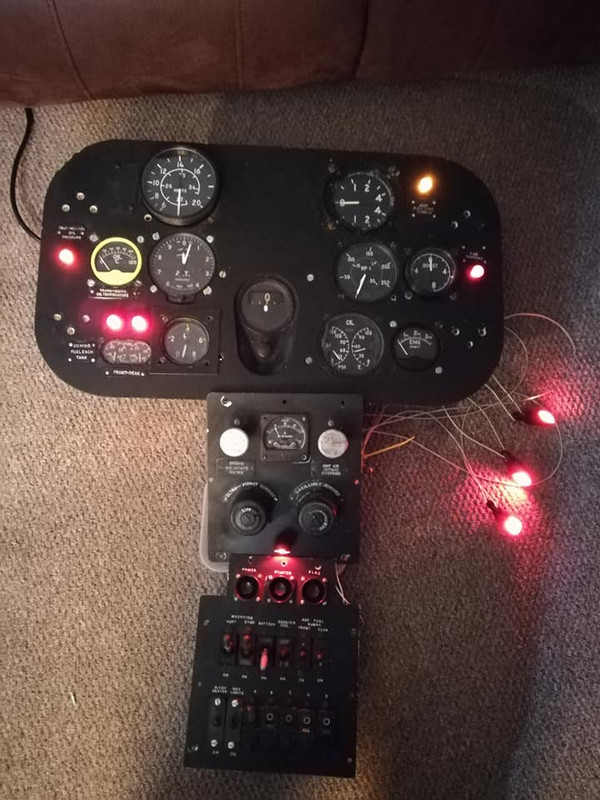
But... The Naughty Corner (East coast division) did receive a little project, in the form of the panels out of our Westland Dragonfly. This aircraft was restored by and was a labour of love over many years for the late and much missed Ray "Mac" Mcelwain. He did a great job of building her from several wrecks to produce this:
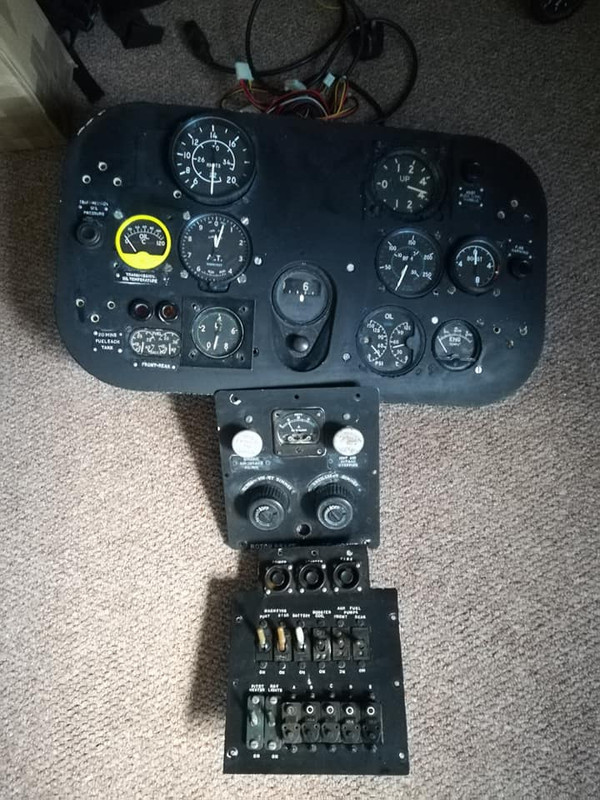
The panels had been removed as several of the instruments were a little "glowy" for the museum's liking, and replica instruments had been made by Replitek. While the panels were out the idea was batted around to power the lights in the aircraft in a similar way to my Lincoln panel, ie. using a PC ATX PSU to provide a reliable mains-12v power supply. I figure there is room to stow a 12v PSU in the instrument pedestal, powering the instrument panel lights, the warning lights, and maybe even the nav lights on the sides. The Dragonfly is an ideal candidate for this, as the expanse of glass means the interior is very visible indeed. So, why not use a bit of modern technology to bring a bit of life back to the old beast?! I dug out another PSU, and the panel set arrived yesterday evening. Here, the replica instruments are in place and the panels laid out as they are in the aircraft.
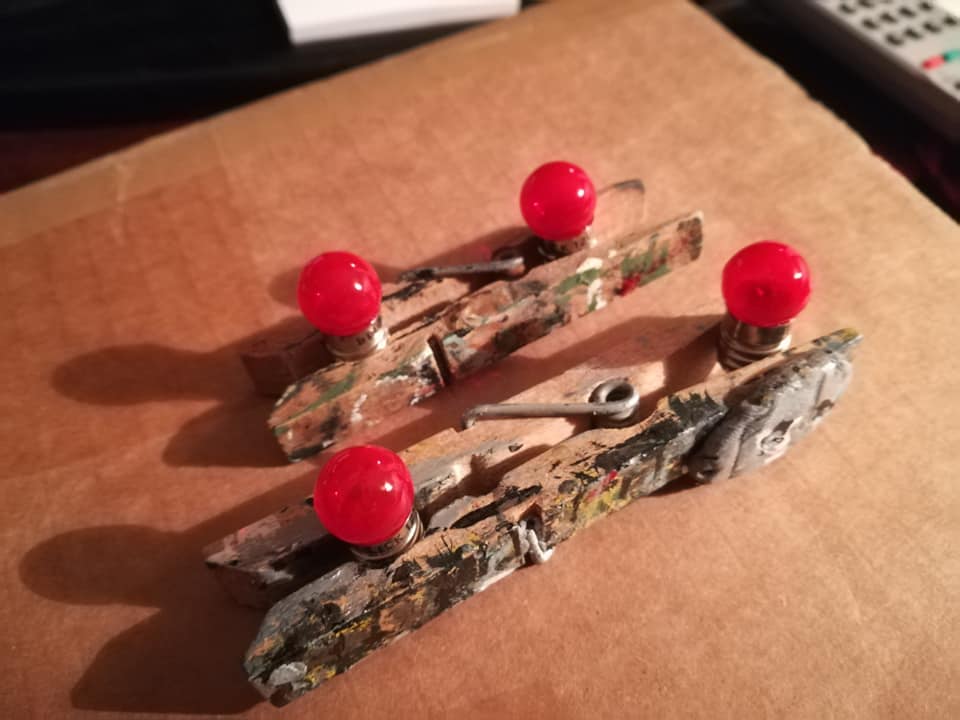
I decided to swap out that rate of climb indicator as I had a better one in stock. The voltmeter is rotted out internally, so there is a (hopefully) working one on its way to me. First job was to paint up 4 12v bulbs with the red glass paint which has proved to be such a good purchase!
These were given several coats last night so they would be ready to use today. While I was painting up a Vulcan CSI case I also gave the lamp shrouds a tidy up, spraying the outsides matt black
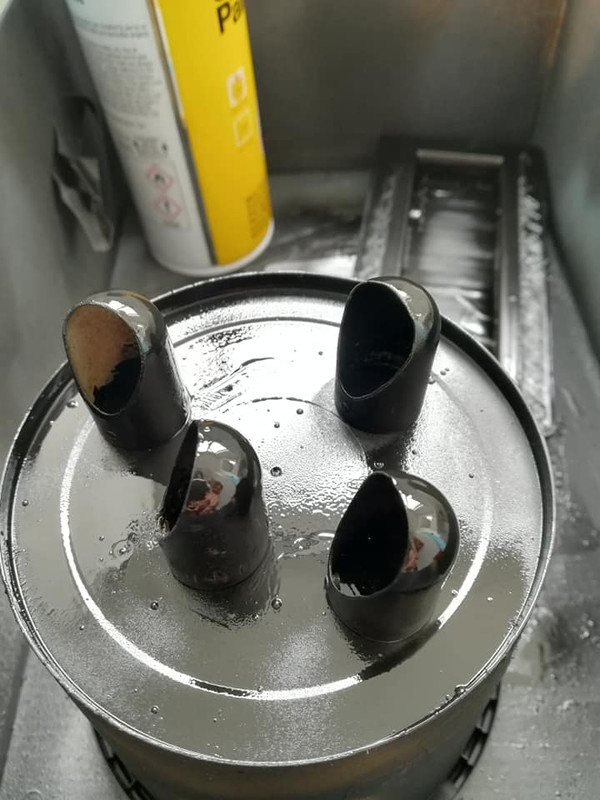
then later painting the insides silver to in theory reflect more light.
I started making up the wiring then. My plan was to use the battery switch as the power on/off switch, and run the panel lights through the original dimmer switch which my trusty meter soon proved was serviceable. The warning lights in the panel would just be wired to come on when the PSU was powered up.
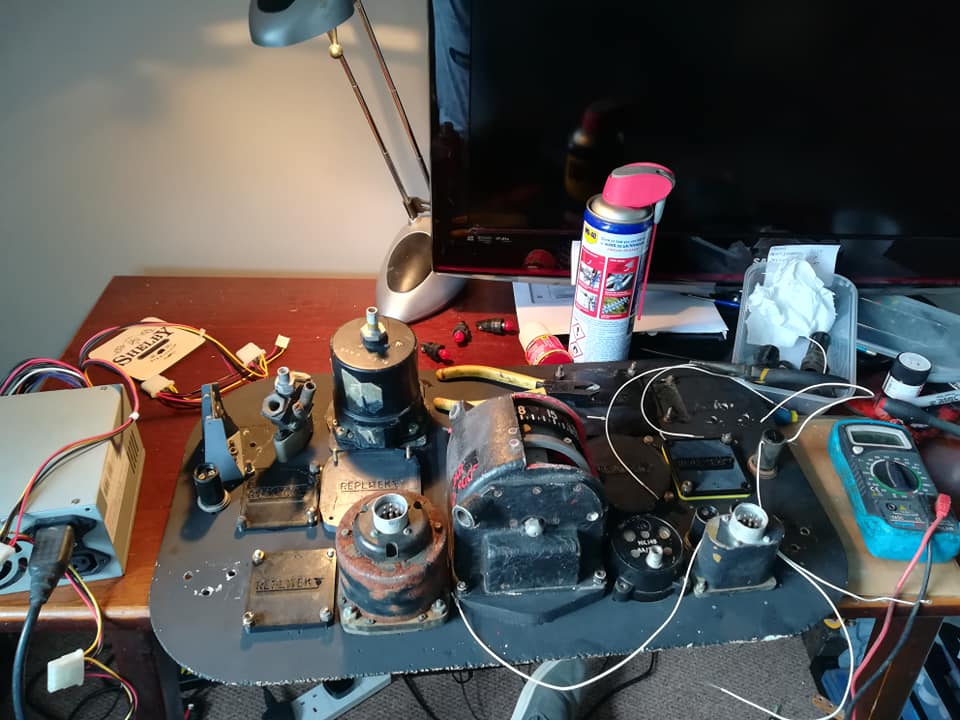
Appropriately, the wire I was using was salvaged from the grandchild of the Dragonfly, the Westland Sea King, in this case XZ598. I next tested the warning lights...
While all worked I wasn't happy with the flip lamp on the left, and swapped it for a plain red lamp I had in stock. The battery switch and dimmer wiring was made up next...
A quick test to prove everything worked how I wanted it to, then it was out with the soldering iron. All wiring joints but those from the lower consoles were soldered; the battery switch and dimmer wiring have Air Ministry junction boxes fitted as they have to pass through the structure of the pedestal and I figured a breakpoint was no bad thing. Then the moment of truth...
All done! So next, await the arrival of the voltmeter and fit said beastie, then box it all back up and dispatch it back to YAM for fitting. Whenever that may occur...
I'm claiming this as an actual update, because it involves a bit of the Meteor. It also includes more than a smidge of Westland Dragonfly, and even a pinch of Sea King!
First the token Meteor offering. Yes, I've found and fitted a bulb for the tail light I rebuilt last week or whenever it was. You lose track...
You wouldn't miss that bugger on a dark night! And apart from the fact that the radio racks out of the back of the jet are currently with Simon and getting a restoration, repaint, and new shock mounts, that's it for 788 for now as I still haven't had the instrument panel retrieved and sent my way for rectification

But... The Naughty Corner (East coast division) did receive a little project, in the form of the panels out of our Westland Dragonfly. This aircraft was restored by and was a labour of love over many years for the late and much missed Ray "Mac" Mcelwain. He did a great job of building her from several wrecks to produce this:
The panels had been removed as several of the instruments were a little "glowy" for the museum's liking, and replica instruments had been made by Replitek. While the panels were out the idea was batted around to power the lights in the aircraft in a similar way to my Lincoln panel, ie. using a PC ATX PSU to provide a reliable mains-12v power supply. I figure there is room to stow a 12v PSU in the instrument pedestal, powering the instrument panel lights, the warning lights, and maybe even the nav lights on the sides. The Dragonfly is an ideal candidate for this, as the expanse of glass means the interior is very visible indeed. So, why not use a bit of modern technology to bring a bit of life back to the old beast?! I dug out another PSU, and the panel set arrived yesterday evening. Here, the replica instruments are in place and the panels laid out as they are in the aircraft.
I decided to swap out that rate of climb indicator as I had a better one in stock. The voltmeter is rotted out internally, so there is a (hopefully) working one on its way to me. First job was to paint up 4 12v bulbs with the red glass paint which has proved to be such a good purchase!
These were given several coats last night so they would be ready to use today. While I was painting up a Vulcan CSI case I also gave the lamp shrouds a tidy up, spraying the outsides matt black
then later painting the insides silver to in theory reflect more light.
I started making up the wiring then. My plan was to use the battery switch as the power on/off switch, and run the panel lights through the original dimmer switch which my trusty meter soon proved was serviceable. The warning lights in the panel would just be wired to come on when the PSU was powered up.
Appropriately, the wire I was using was salvaged from the grandchild of the Dragonfly, the Westland Sea King, in this case XZ598. I next tested the warning lights...
While all worked I wasn't happy with the flip lamp on the left, and swapped it for a plain red lamp I had in stock. The battery switch and dimmer wiring was made up next...
A quick test to prove everything worked how I wanted it to, then it was out with the soldering iron. All wiring joints but those from the lower consoles were soldered; the battery switch and dimmer wiring have Air Ministry junction boxes fitted as they have to pass through the structure of the pedestal and I figured a breakpoint was no bad thing. Then the moment of truth...
All done! So next, await the arrival of the voltmeter and fit said beastie, then box it all back up and dispatch it back to YAM for fitting. Whenever that may occur...
Meteor WS788/ Chippy WK640 Restoration Project, YAM
Shack WR963, Coventry
Other types meddled with by request!
Shack WR963, Coventry
Other types meddled with by request!
Re: A-W Meteor NF.14 WS788 Restoration Project
17/06/2020 Update
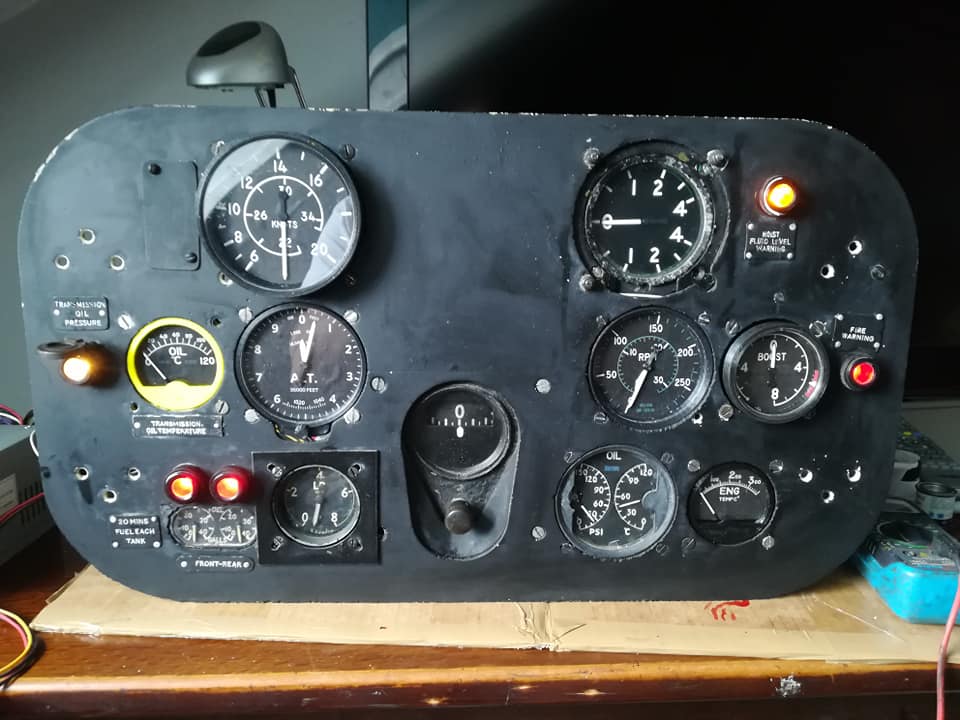
Well it's good to see the Dragonfly panel had you all head over heels in excitement... It has now returned from whence it came, after having a new serviceable voltmeter installed. So seeing as instrument panel restoration clearly gets you all of a fluster... here's another one for you. This time, back on familiar ground, it's 788's
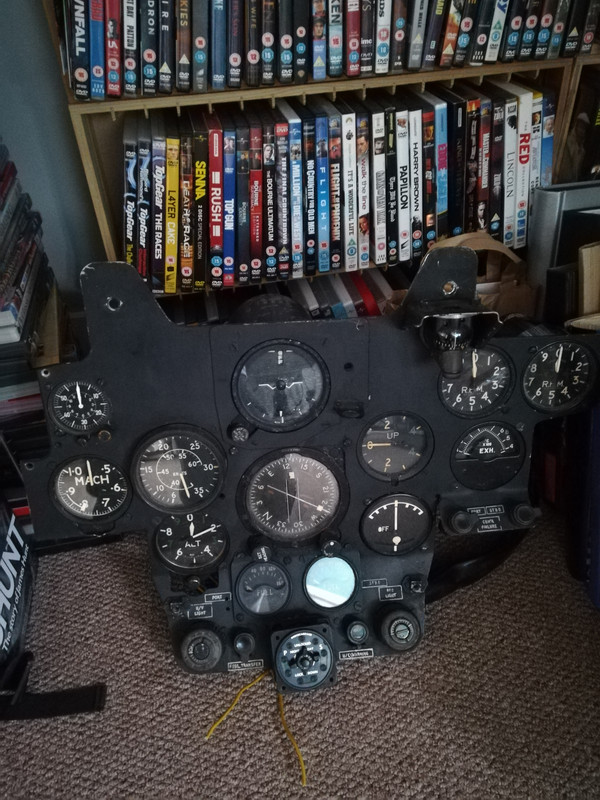
As arrived with me, and it didn't look too bad. I hadn't intended to redo the panel, but after seeing how well the trim box came out and looking at how scruffy the rest of the cockpit looked by comparison, well, I've made a rod for my own back. And stripping the panel down, it's probably a good thing I did... So I got it on my desk, and started stripping it to a bare panel. This meant labelling and undoing all the wiring work I had done, but that's fine as that is all familiar ground. Then, start pulling instruments...
And when you find stuff like this hiding out of normal view... yeah, it was the right call

Many of the screws and nuts holding the instruments and caption plates in were very reluctant, but I got there in the end
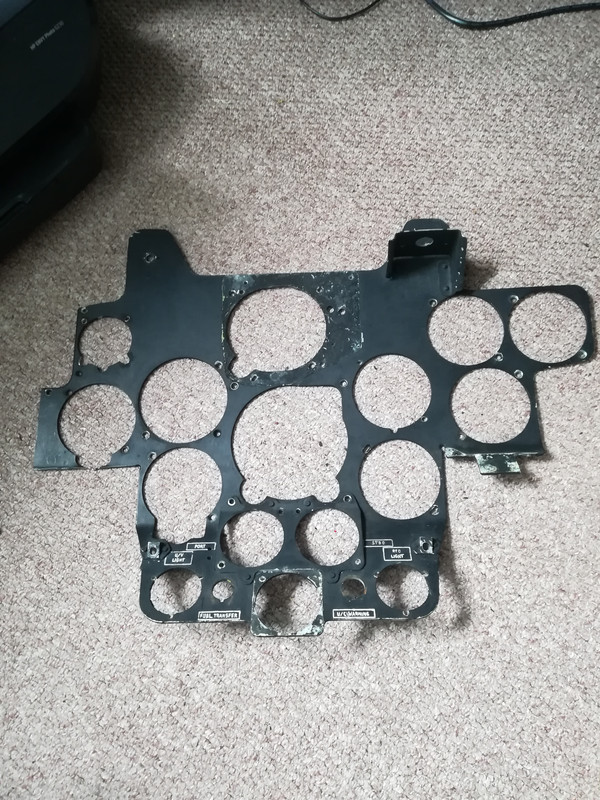
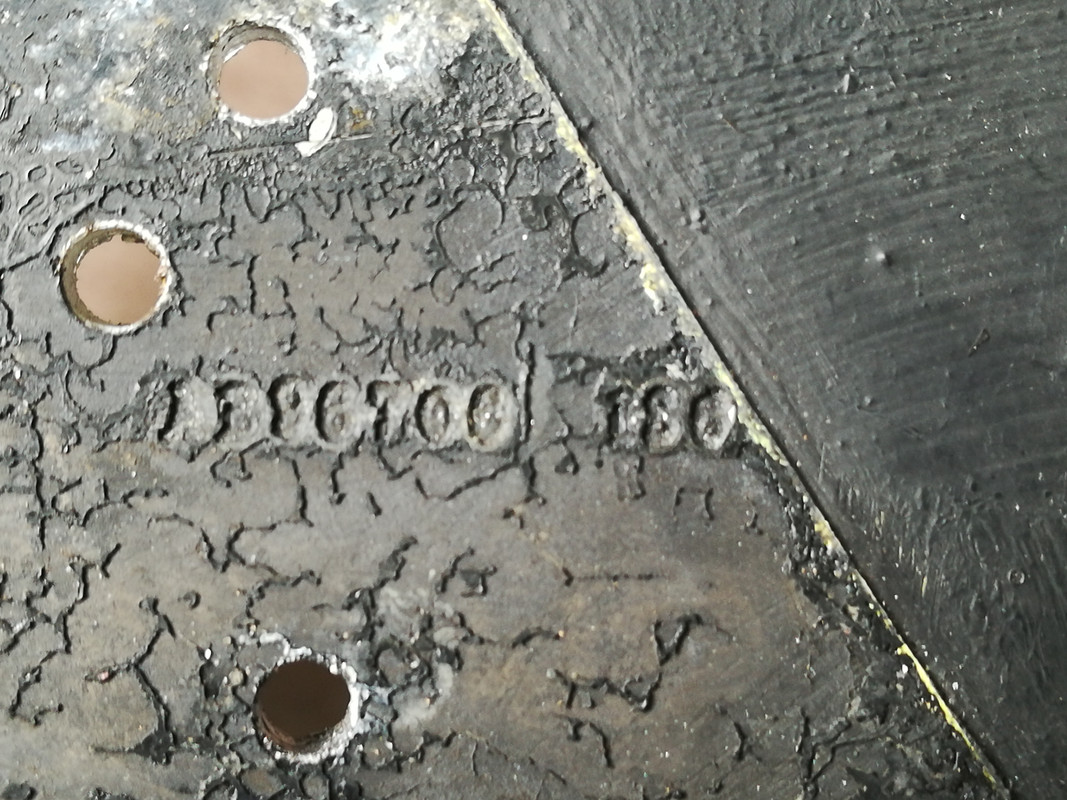
Even finding on the instrument panel's face, normally hidden behind the modification AH adapter plate the instrument panel's AW part number...
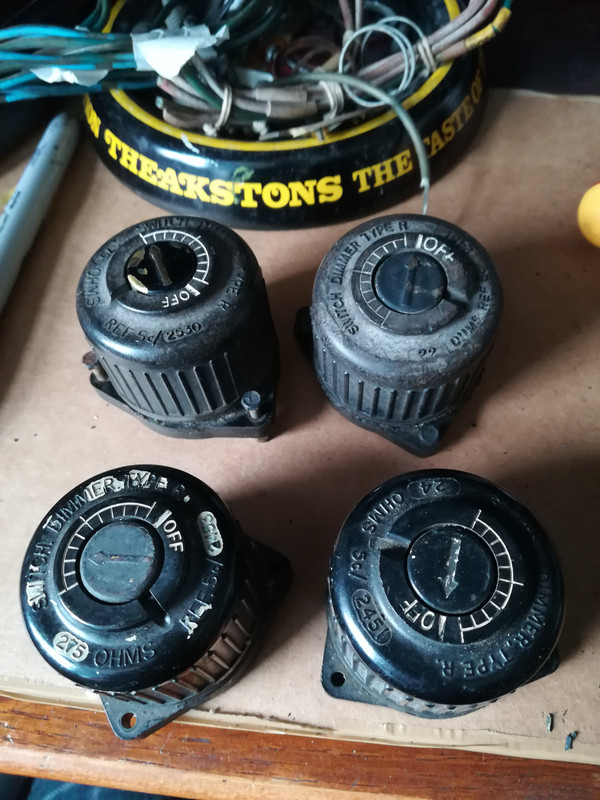
The rotary dimmers work, but her originals (top) are scruffy so will be replaced by either the 2 lower ones out of my stock, or even better ones I know I have lying around somewhere...
A bit of corrosion just starting behind the Genny warning light caption panels. That'll soon sort, but better now than left then bursting out in a couple of year's time!
Fuel gauges work, but the cases need a rub back and paint. I may fit my known good spare, last fitted to her sister ship WS787 and spares recovered off her when she was prepared for gate guard duties at RAF Tengah.
The rate of climb indicator has a date and serial inked on. I hope to clean this sympathetically, and at least read and restore these marks...
So, one kit of parts.
The Theakston's ashtray is essential original issue equipment, perfect for not losing screws, springs, essential bits of "WTF was that off...?"
Well it's good to see the Dragonfly panel had you all head over heels in excitement... It has now returned from whence it came, after having a new serviceable voltmeter installed. So seeing as instrument panel restoration clearly gets you all of a fluster... here's another one for you. This time, back on familiar ground, it's 788's
As arrived with me, and it didn't look too bad. I hadn't intended to redo the panel, but after seeing how well the trim box came out and looking at how scruffy the rest of the cockpit looked by comparison, well, I've made a rod for my own back. And stripping the panel down, it's probably a good thing I did... So I got it on my desk, and started stripping it to a bare panel. This meant labelling and undoing all the wiring work I had done, but that's fine as that is all familiar ground. Then, start pulling instruments...
And when you find stuff like this hiding out of normal view... yeah, it was the right call
Many of the screws and nuts holding the instruments and caption plates in were very reluctant, but I got there in the end
Even finding on the instrument panel's face, normally hidden behind the modification AH adapter plate the instrument panel's AW part number...
The rotary dimmers work, but her originals (top) are scruffy so will be replaced by either the 2 lower ones out of my stock, or even better ones I know I have lying around somewhere...
A bit of corrosion just starting behind the Genny warning light caption panels. That'll soon sort, but better now than left then bursting out in a couple of year's time!
Fuel gauges work, but the cases need a rub back and paint. I may fit my known good spare, last fitted to her sister ship WS787 and spares recovered off her when she was prepared for gate guard duties at RAF Tengah.
The rate of climb indicator has a date and serial inked on. I hope to clean this sympathetically, and at least read and restore these marks...
So, one kit of parts.
The Theakston's ashtray is essential original issue equipment, perfect for not losing screws, springs, essential bits of "WTF was that off...?"
Meteor WS788/ Chippy WK640 Restoration Project, YAM
Shack WR963, Coventry
Other types meddled with by request!
Shack WR963, Coventry
Other types meddled with by request!
-
TEXANTOMCAT

- Posts: 358
- Joined: Sat 09 Aug 2014, 5:40 pm
Re: A-W Meteor NF.14 WS788 Restoration Project
Brilliant stuff truly a bit and bolt restoration!
TT
TT
Re: A-W Meteor NF.14 WS788 Restoration Project
Cheers TT! More nuts and bolts for you in today's installment...
19/06/2020 Update
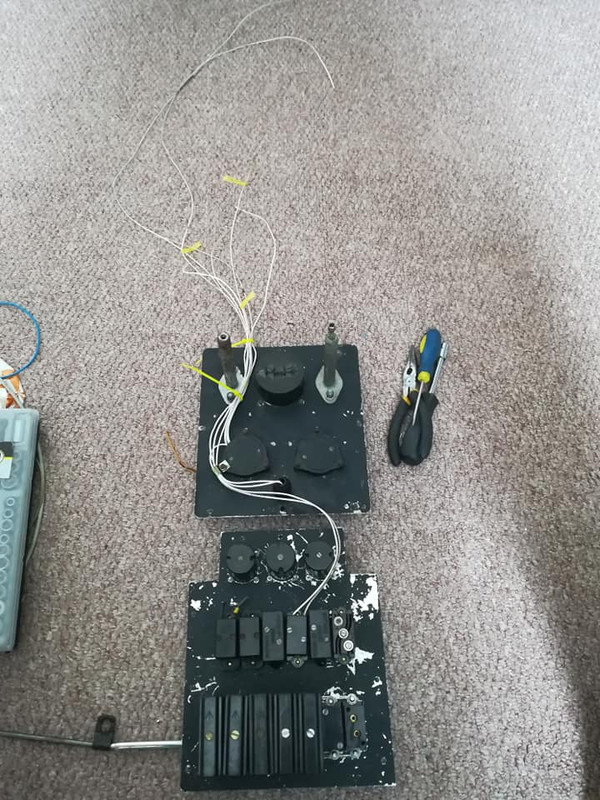
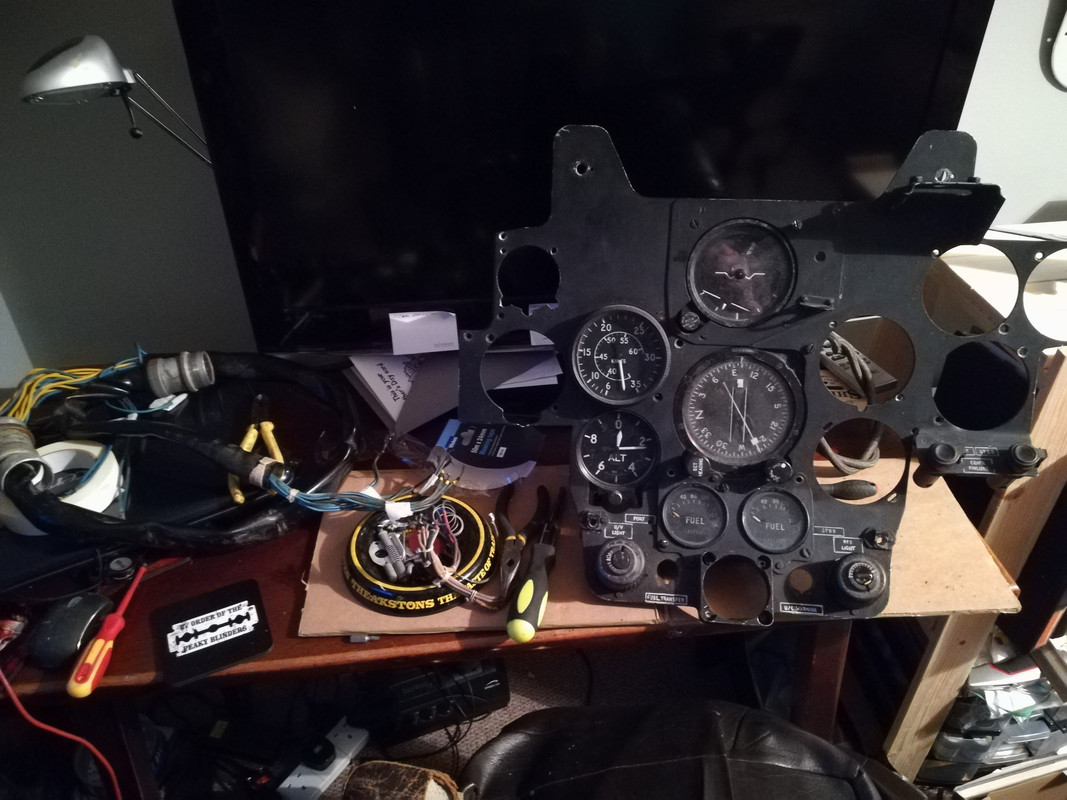
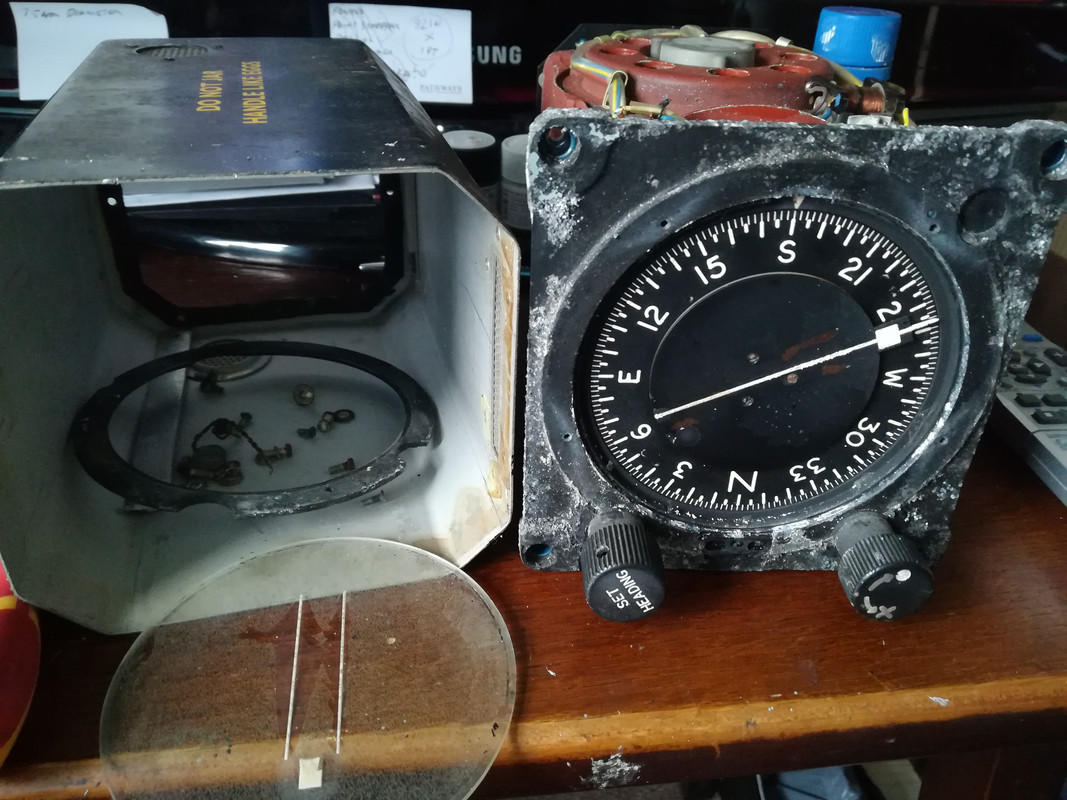
Well it was a thoroughly grey and miserable day here on the Yorkshire coast yesterday, just perfect for sitting indoors playing with old bits of aircraft. In the case of 788's instrument panel, many tiny, fiddly bits of old aircraft! So, after introducing the panel itself to its first close encounter of the Nitromors kind...
...the first instrument onto the bench for some love and attention was the rate of climb indicator. My plan with all the instruments was to clean up, paint as necessary, test if possible,just generally get the whole panel looking much nicer. I found that Silvo is great for bringing old bakelite instrument cases back into nice order, so had my bottle on standby.
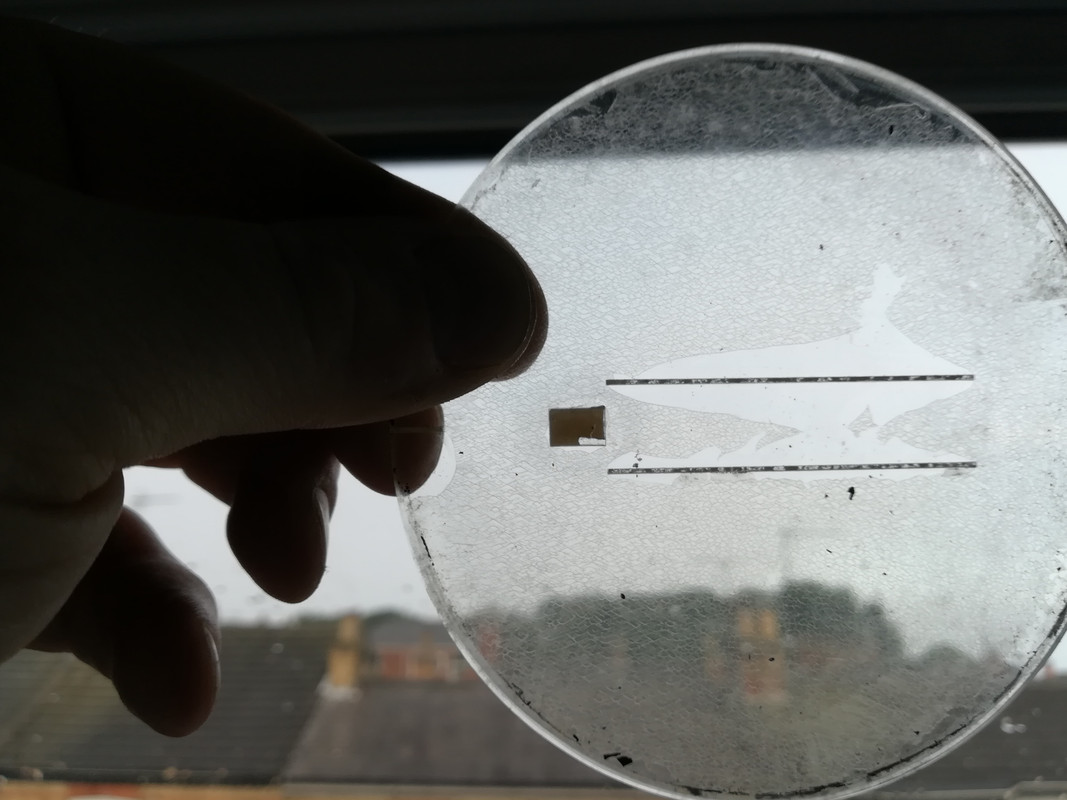
You may recall from the last enthralling episode (!) that there were markings on the rate of climb indicator which I was keen to read. Well, a careful clean and the secrets were revealed!
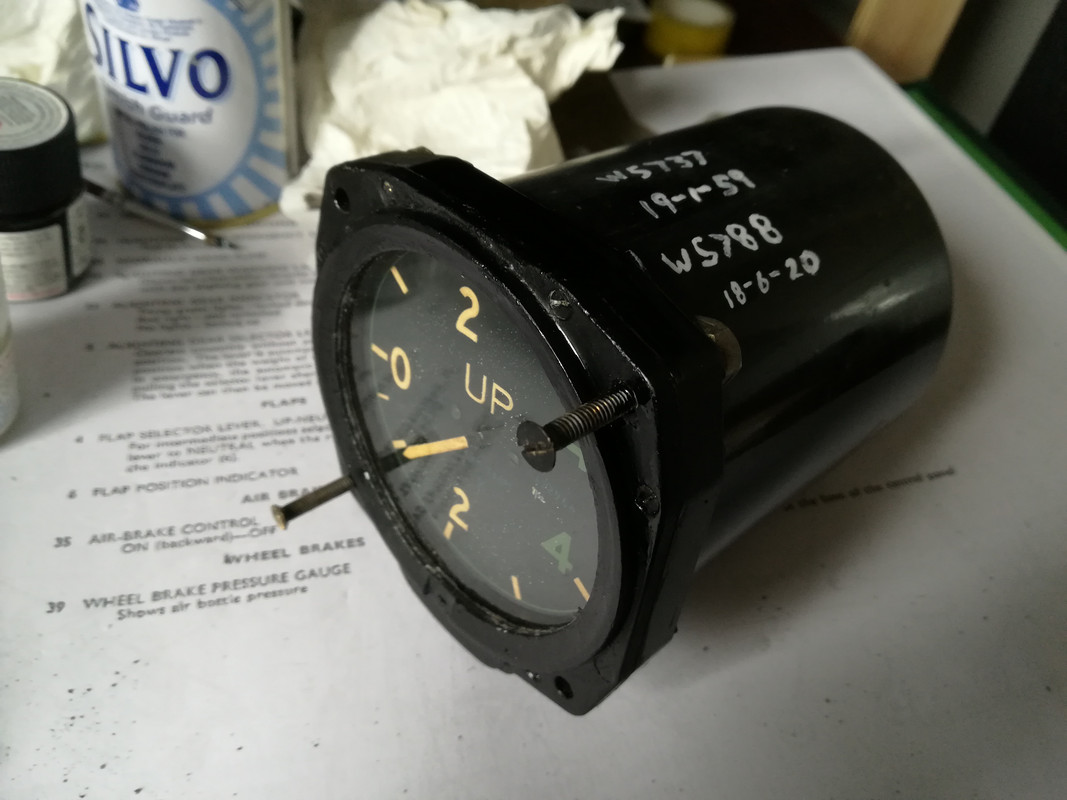
Looks like WS737, 19-1-59. A quick polish up showed it even clearer, as well as the difference the Silvo can make. I'm told Brasso works well too...
So this came from one of 788's 1ANS sister ships, NF(T)14 WS737/H , also previously with 85Sqn and 2ANS. 737 was flown to RAF Manston in 1966 to meet her fate with the RAF firefighting school there, and presumably perished later in the decade...
https://www.aviationphotocompany.com/p8 ... #h72f0172b
Anyway, the instrument was tested, cleaned up, then its markings reinstated
I then added new markings reflecting its new home to bring it bang up to date
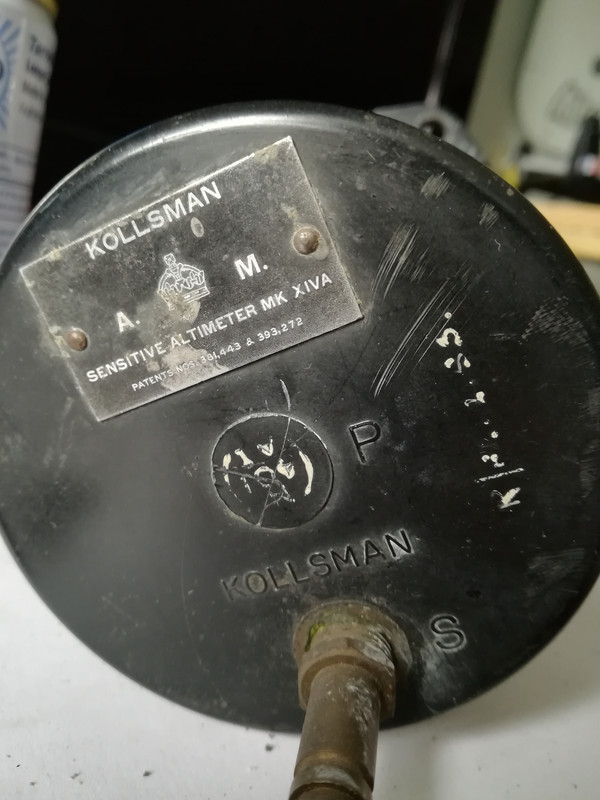
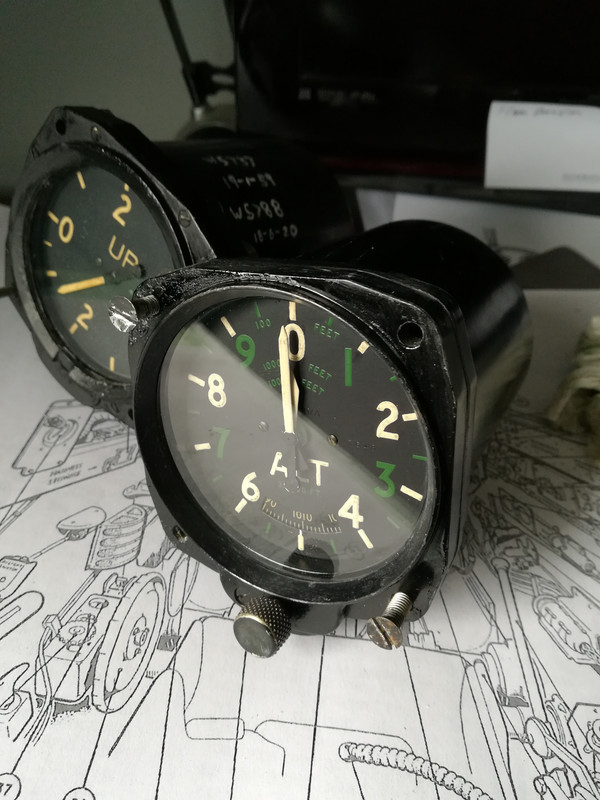
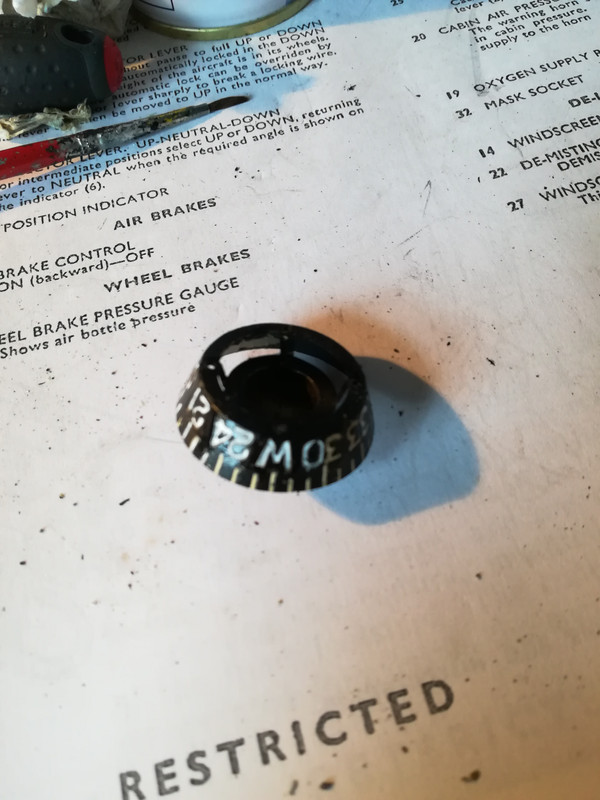
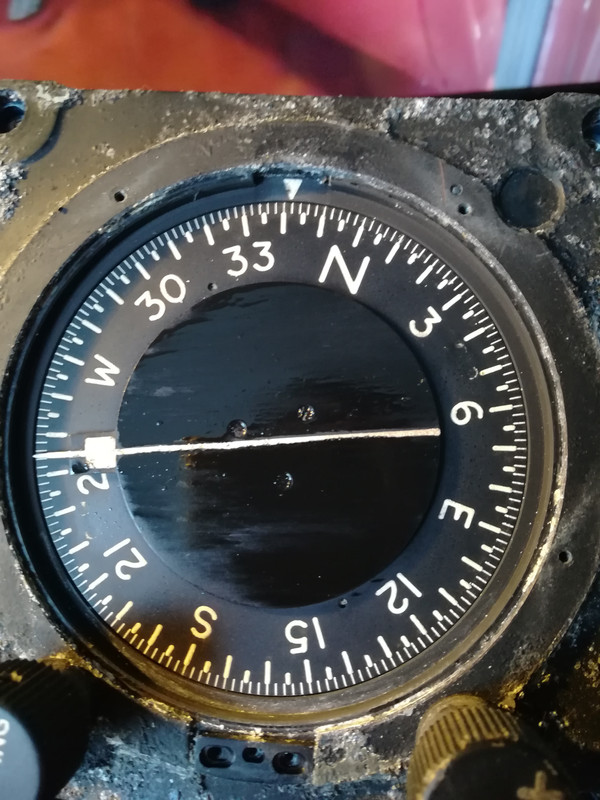
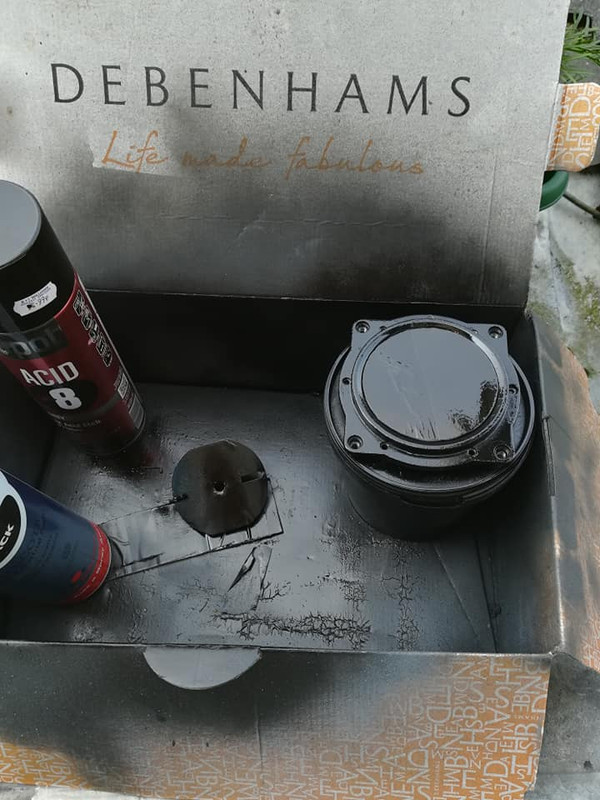
Next up was the Kollsman Mk.XIV altimeter. This wasn't in too bad condition, but it rattled.
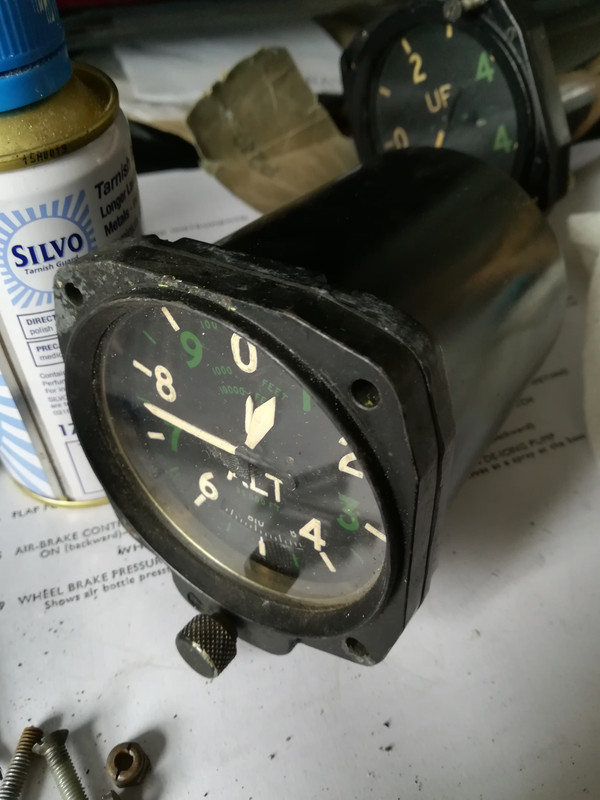
Precision instruments shouldn't rattle, not even 1953 dated ones!
So I took it apart, put the guts back together as they should be, repainted the spacer between the glass and the instrument face as years of baking in the sun had burnt the paint off the lower half of it, then simply clean, polish, reassemble!
Next instrument randomly grabbed from the box was the ASI. This is a known good unit, but needed a good clean. You can see here the casing before Silvo...
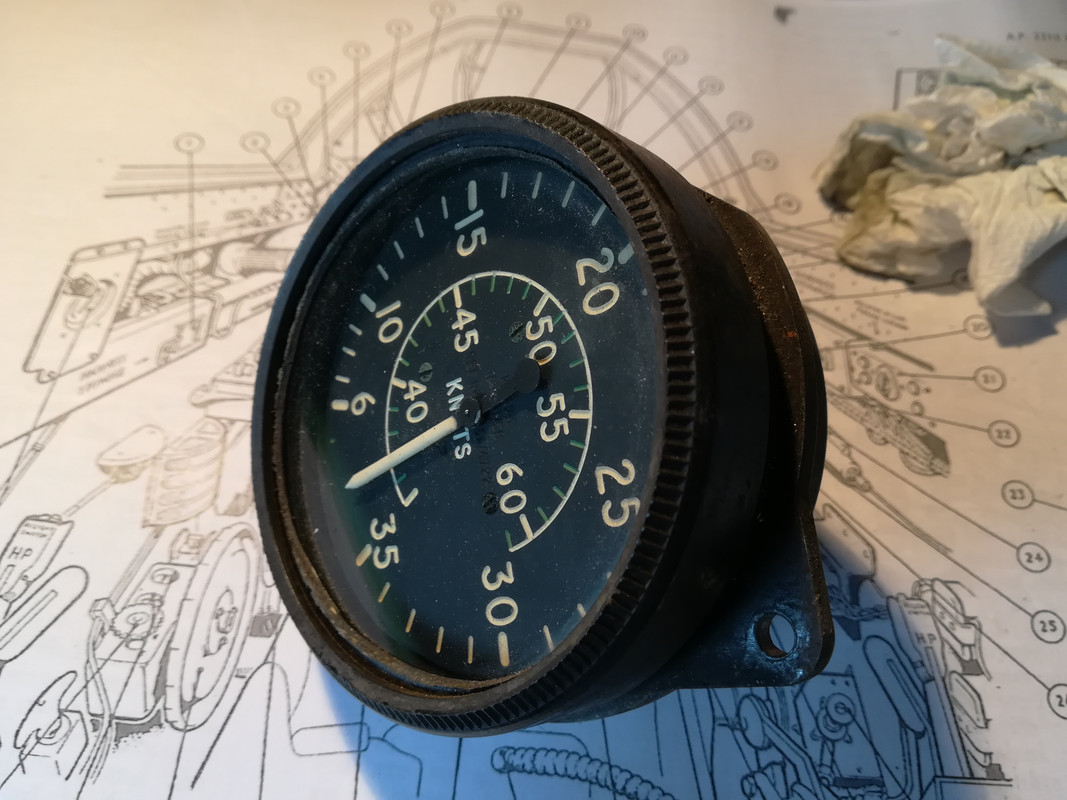
It's all matt and horrible. Then, after a polish up...
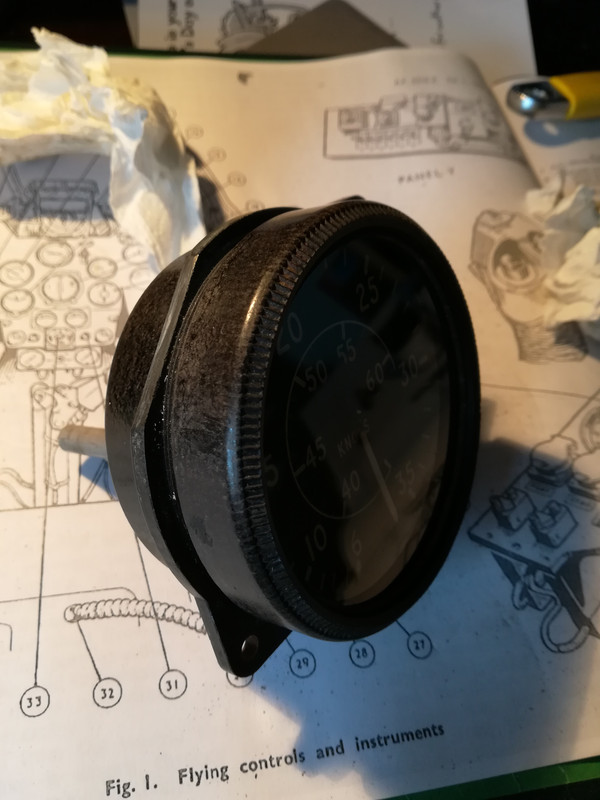
Even in the crappy light I took the pic in you can see it's greatly improved!
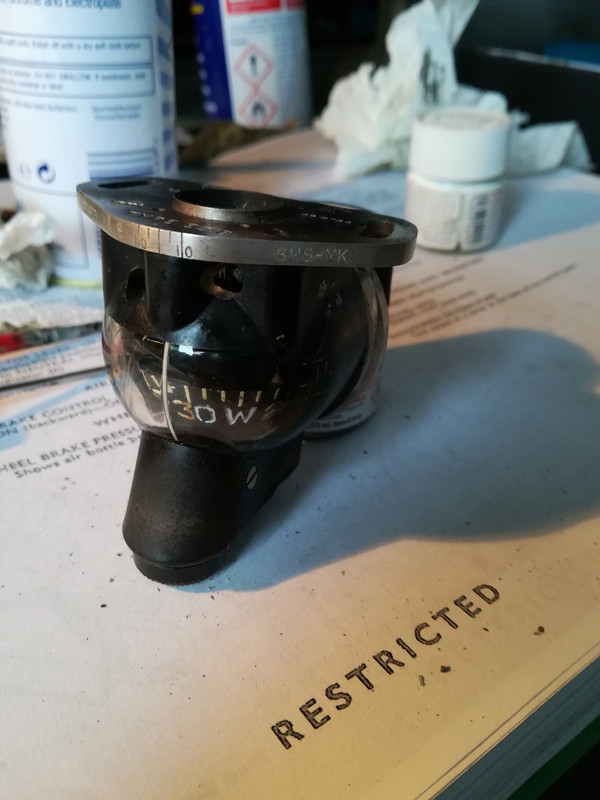
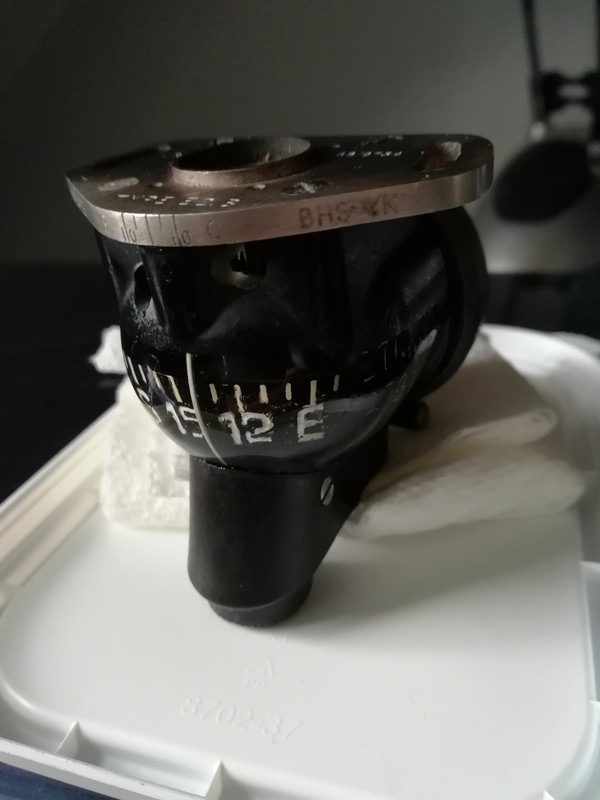
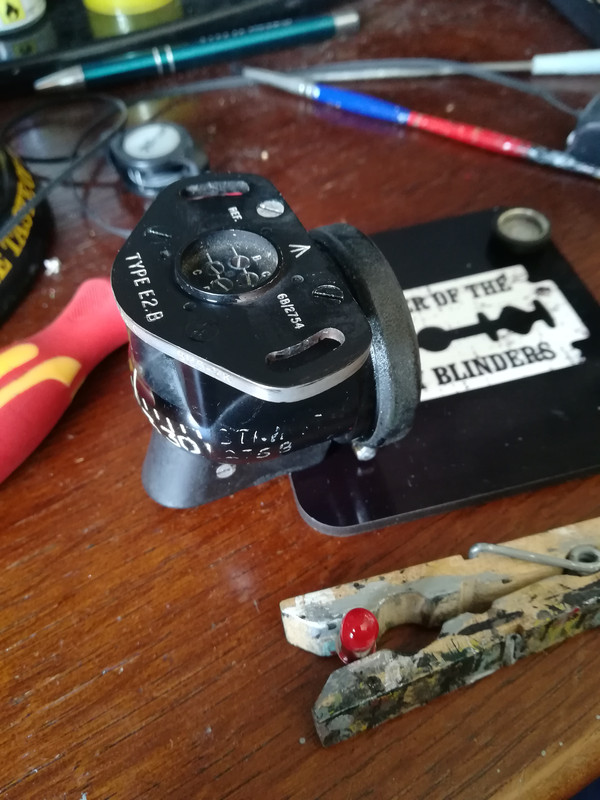
Then, out of the box came the E2B standby compass. It was clear this needed some love, as the bit inside the compass was peeling paint. SO, I had no choice but to dismantle the unit, draining the fluid into a cup.
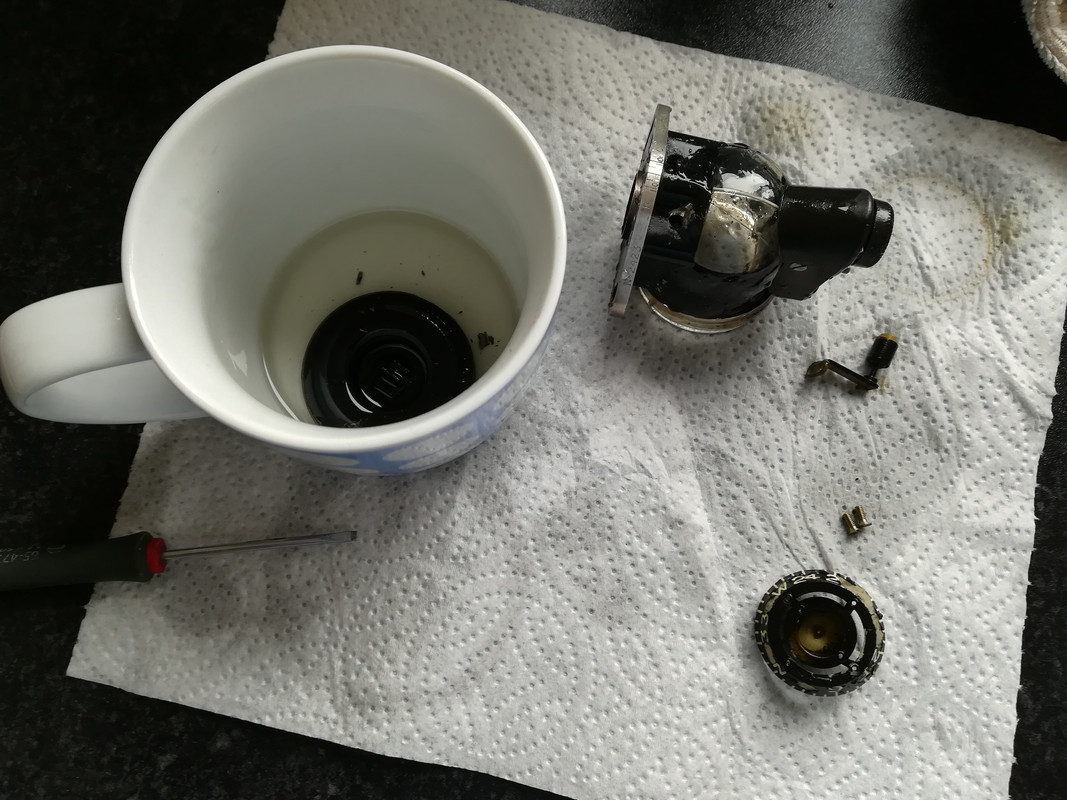
Once everything was cleaned, very carefully as it's a delicate little mite, well you can see the extent of the problem...
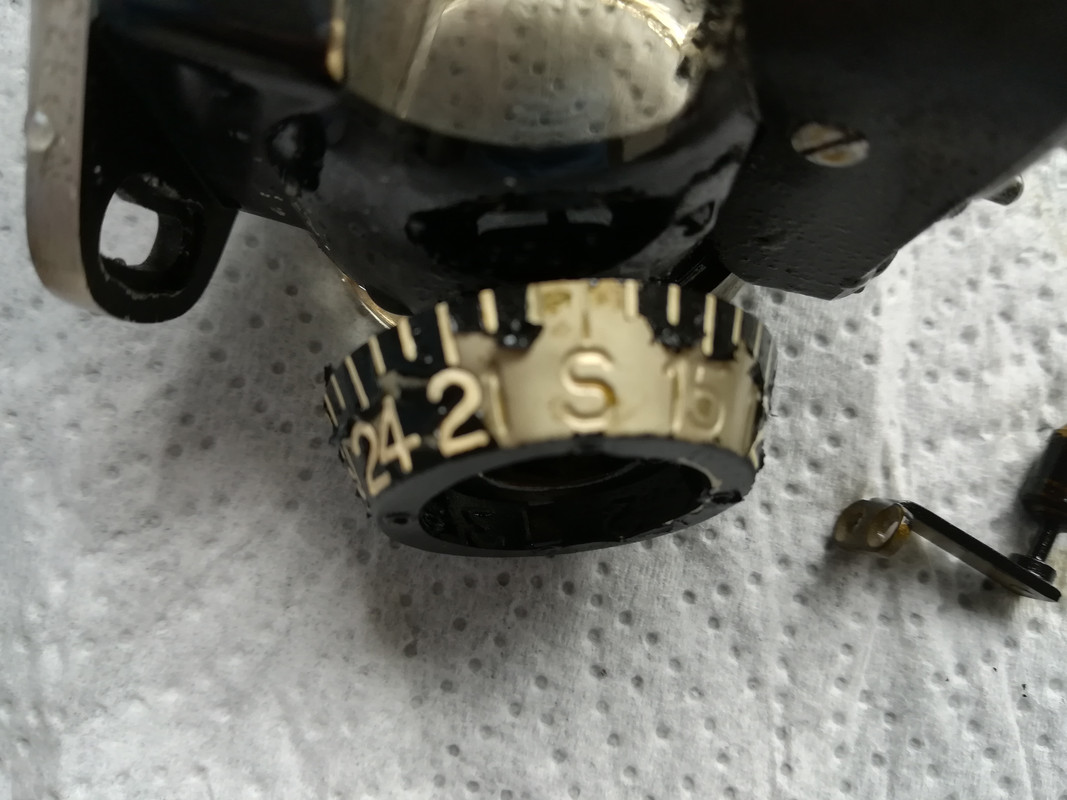
So out with the small brushes, and the really really steady hand...
Good enough I reckon
This just need refilling with new fluid, then it's ready to have the back put on and sealed once more. Next up, the 2 RPM gauges.
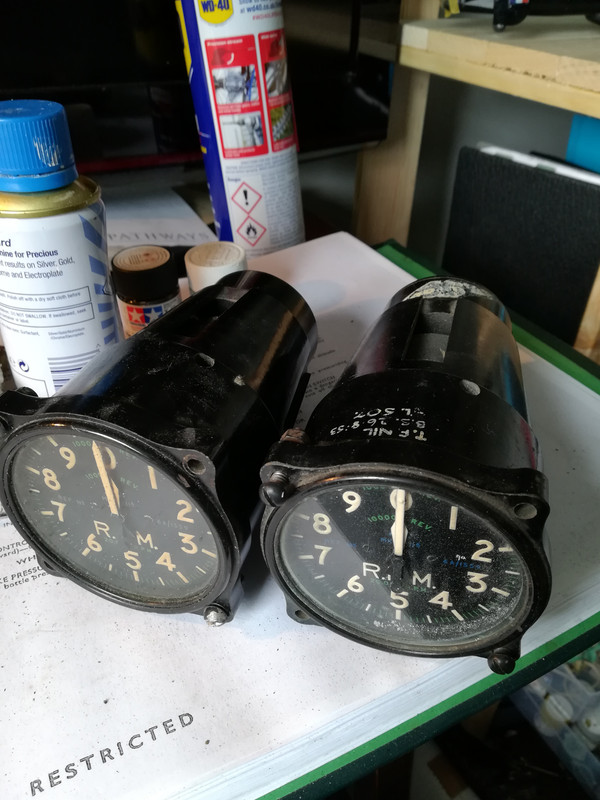
As you can see, one of these previously belonged to Vampire FB.9 WL507, which served on the strength of 60 Sqn RAF and 14(NZ) Sqn as "M" at RAF Tengah during Operation Firedog in 1955. It was a short and active life for the Vampire, entering service in January 1952 and being disposed of at No.48MU, Hawarden, December 1958. A component going on our Meteor that has seen genuine combat service!
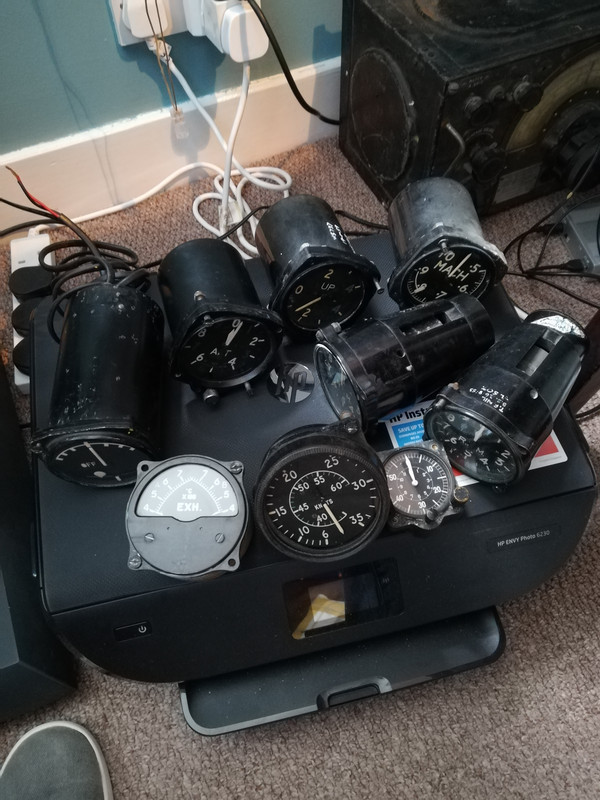
So the rest of the instruments went through a similar process, until I had a nice shiny heap of glass and bakelite by the end of the afternoon
I didn't bother with the fuel gauges, as that nice man Bruce of GB Air Spares is sending us a NOS pair, very kindly!
2 of the instruments need a bit more love though. The artificial horizon...
But first the Mk.4B compass I showed you in the last post. It is, to coin a technical term, manky. Bruce did offer us another one, but I figure a bit of work would see this one back on top form, so I started dismantling it. My main aims are to get the case corrosion removed, fix the peeled paint on the instrument face, and get rid of the odd film on the inside of the glass.
The film I mentioned
Which I shifted this morning with soap, water, and a nailbrush, and the glass is crystal clear once more. But back to last night, the damaged paint on the face was sorted
While I had paint out I did the bezel for the glass too.
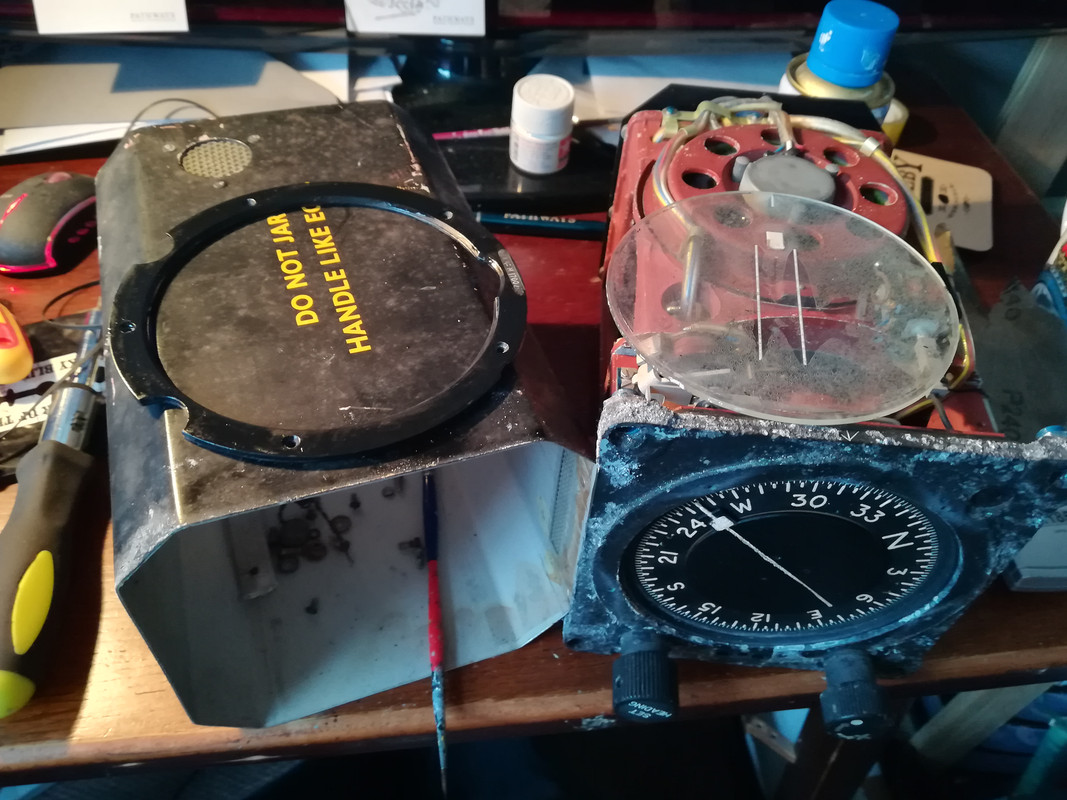
Hopefully this morning I'll get that corrosion sorted and get the thing in new paint and looking much happier!
19/06/2020 Update
Well it was a thoroughly grey and miserable day here on the Yorkshire coast yesterday, just perfect for sitting indoors playing with old bits of aircraft. In the case of 788's instrument panel, many tiny, fiddly bits of old aircraft! So, after introducing the panel itself to its first close encounter of the Nitromors kind...
...the first instrument onto the bench for some love and attention was the rate of climb indicator. My plan with all the instruments was to clean up, paint as necessary, test if possible,just generally get the whole panel looking much nicer. I found that Silvo is great for bringing old bakelite instrument cases back into nice order, so had my bottle on standby.
You may recall from the last enthralling episode (!) that there were markings on the rate of climb indicator which I was keen to read. Well, a careful clean and the secrets were revealed!
Looks like WS737, 19-1-59. A quick polish up showed it even clearer, as well as the difference the Silvo can make. I'm told Brasso works well too...
So this came from one of 788's 1ANS sister ships, NF(T)14 WS737/H , also previously with 85Sqn and 2ANS. 737 was flown to RAF Manston in 1966 to meet her fate with the RAF firefighting school there, and presumably perished later in the decade...
https://www.aviationphotocompany.com/p8 ... #h72f0172b
Anyway, the instrument was tested, cleaned up, then its markings reinstated
I then added new markings reflecting its new home to bring it bang up to date
Next up was the Kollsman Mk.XIV altimeter. This wasn't in too bad condition, but it rattled.
Precision instruments shouldn't rattle, not even 1953 dated ones!
So I took it apart, put the guts back together as they should be, repainted the spacer between the glass and the instrument face as years of baking in the sun had burnt the paint off the lower half of it, then simply clean, polish, reassemble!
Next instrument randomly grabbed from the box was the ASI. This is a known good unit, but needed a good clean. You can see here the casing before Silvo...
It's all matt and horrible. Then, after a polish up...
Even in the crappy light I took the pic in you can see it's greatly improved!
Then, out of the box came the E2B standby compass. It was clear this needed some love, as the bit inside the compass was peeling paint. SO, I had no choice but to dismantle the unit, draining the fluid into a cup.
Once everything was cleaned, very carefully as it's a delicate little mite, well you can see the extent of the problem...
So out with the small brushes, and the really really steady hand...
Good enough I reckon
This just need refilling with new fluid, then it's ready to have the back put on and sealed once more. Next up, the 2 RPM gauges.
As you can see, one of these previously belonged to Vampire FB.9 WL507, which served on the strength of 60 Sqn RAF and 14(NZ) Sqn as "M" at RAF Tengah during Operation Firedog in 1955. It was a short and active life for the Vampire, entering service in January 1952 and being disposed of at No.48MU, Hawarden, December 1958. A component going on our Meteor that has seen genuine combat service!
So the rest of the instruments went through a similar process, until I had a nice shiny heap of glass and bakelite by the end of the afternoon
I didn't bother with the fuel gauges, as that nice man Bruce of GB Air Spares is sending us a NOS pair, very kindly!
2 of the instruments need a bit more love though. The artificial horizon...
But first the Mk.4B compass I showed you in the last post. It is, to coin a technical term, manky. Bruce did offer us another one, but I figure a bit of work would see this one back on top form, so I started dismantling it. My main aims are to get the case corrosion removed, fix the peeled paint on the instrument face, and get rid of the odd film on the inside of the glass.
The film I mentioned
Which I shifted this morning with soap, water, and a nailbrush, and the glass is crystal clear once more. But back to last night, the damaged paint on the face was sorted
While I had paint out I did the bezel for the glass too.
Hopefully this morning I'll get that corrosion sorted and get the thing in new paint and looking much happier!
Meteor WS788/ Chippy WK640 Restoration Project, YAM
Shack WR963, Coventry
Other types meddled with by request!
Shack WR963, Coventry
Other types meddled with by request!
-
TEXANTOMCAT
- Posts: 358
- Joined: Sat 09 Aug 2014, 5:40 pm
Re: A-W Meteor NF.14 WS788 Restoration Project
Looks terrific - nice tip on the Silvio- I use black boot polish on the instruments I’ve restored and a couple of good quality boot brushes to get in the nooks and crannies - it’s totally benign and forms a barrier to dirt and corrosion 
TT

TT
Re: A-W Meteor NF.14 WS788 Restoration Project
Might give that a try TT!
19/06/2020 Update, part 2...
That there compass, Mk.4B, really wanted some corrosion removing and some fresh paint applying, so that was this morning's task. After digging the corrosion out of the deceptively complex front casting, with many nooks and crannies for the grot to hide in, I made a cardboard blank to fit where the glass would usually sit and masked the insides of the instrument off, before getting a good coat of etch primer applied in my high-tech spray bay!
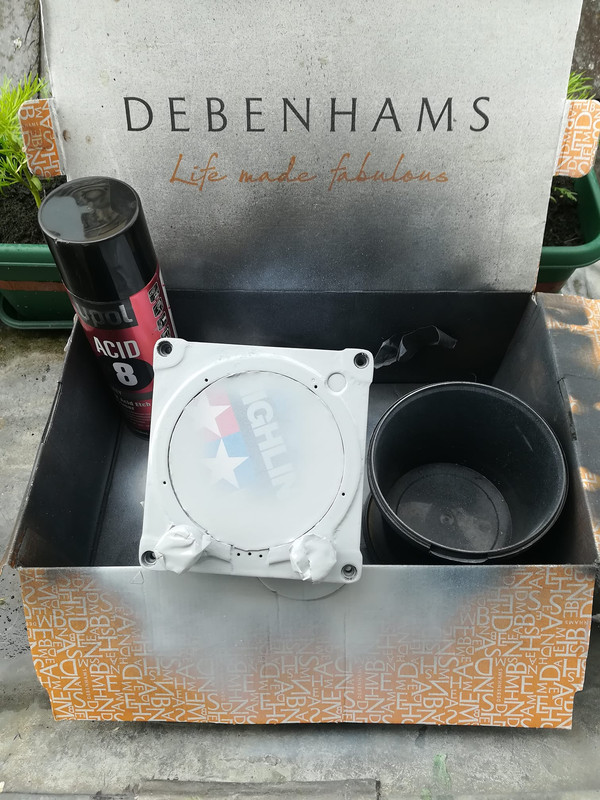
Given it was quite nice this morning for an hour or so, the primer dried quickly so I laid some black on
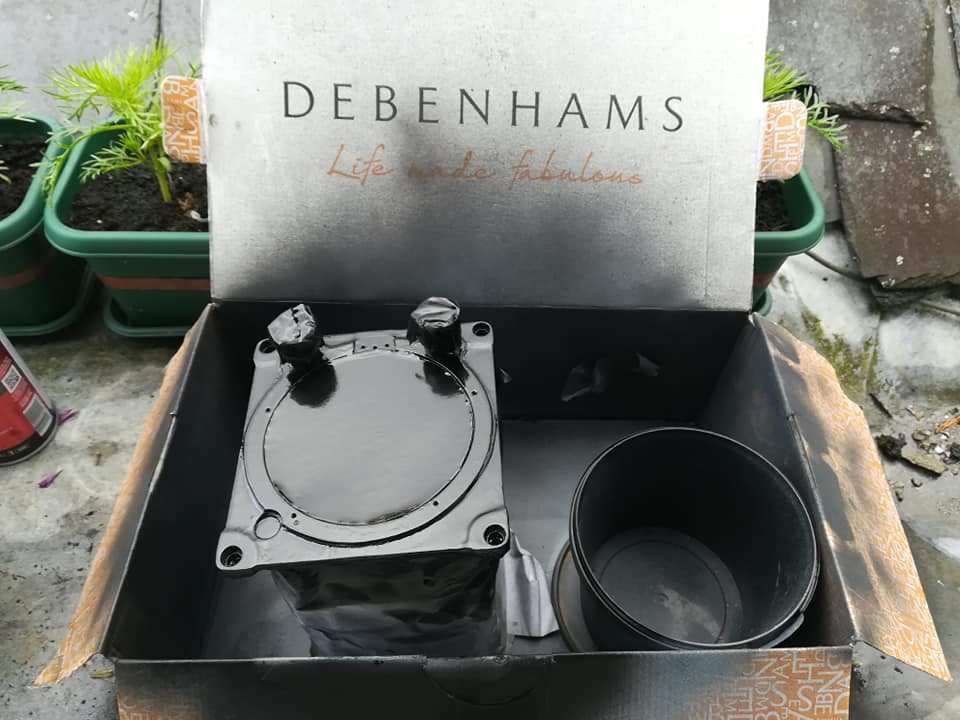
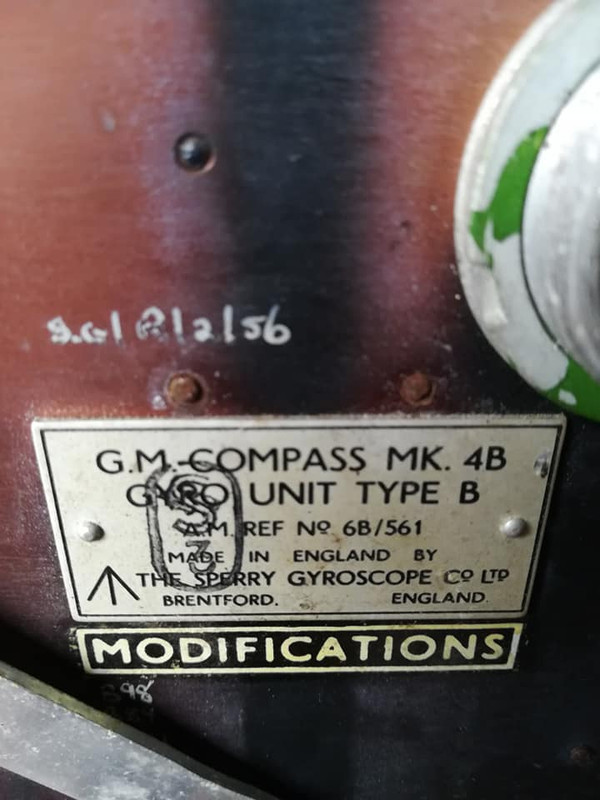
While this was drying I gave the case a good clean up but nothing too excessive. The original paint was plenty good enough. Once the paint had dried, I brought the unit in, demasked it and started reassembling it. According to the markings on the back the last time it got anything like this level of TLC was 1956!
So anyway, the case went back on, as did the front screen and its bezel. The manky film on the inside of the screen was it turns out a condensation-proofing measure, but we won't be needing that. Anyway, all reassembled, and it is a much happier looking unit I'm sure you'll agree! From this...
To this fine specimen


19/06/2020 Update, part 2...
That there compass, Mk.4B, really wanted some corrosion removing and some fresh paint applying, so that was this morning's task. After digging the corrosion out of the deceptively complex front casting, with many nooks and crannies for the grot to hide in, I made a cardboard blank to fit where the glass would usually sit and masked the insides of the instrument off, before getting a good coat of etch primer applied in my high-tech spray bay!
Given it was quite nice this morning for an hour or so, the primer dried quickly so I laid some black on
While this was drying I gave the case a good clean up but nothing too excessive. The original paint was plenty good enough. Once the paint had dried, I brought the unit in, demasked it and started reassembling it. According to the markings on the back the last time it got anything like this level of TLC was 1956!
So anyway, the case went back on, as did the front screen and its bezel. The manky film on the inside of the screen was it turns out a condensation-proofing measure, but we won't be needing that. Anyway, all reassembled, and it is a much happier looking unit I'm sure you'll agree! From this...
To this fine specimen
Meteor WS788/ Chippy WK640 Restoration Project, YAM
Shack WR963, Coventry
Other types meddled with by request!
Shack WR963, Coventry
Other types meddled with by request!
Re: A-W Meteor NF.14 WS788 Restoration Project
21/06/2020 Update
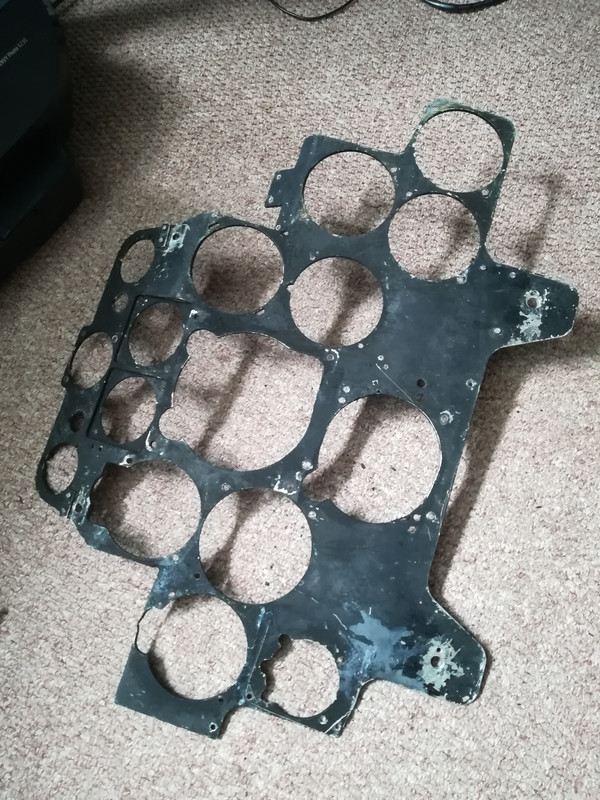
It's been a good couple of days for me. I managed to make (I think) my first 2020 visit to someone else's 'toy collection' on Friday, paying a visit to the comparatively local to me Canberra WK124 cockpit restoration guys to pick up some JP wheels and tyres for YAM. It was nice to get a tour of the Canberra and their other projects, socially distant of course, and in the course of chatting we found we were able to help each other. So, yesterday I met up with them again to lend them a couple of my own panels to replicate, and while they were at it they kindly took this lump to paint strip for me!
It had just giggled at the Nitromors, and obviously right now my facilities are limited to what I've got at home, but being in the engineering/fabricating industry getting the panel back to shiny bare metal is nothing to them. It's always good to make links with other groups and try to help each other out; not that everyone in this game seems to appreciate that sadly. So huge thanks to them for doing this favour for me, and thanks for the random goodies!
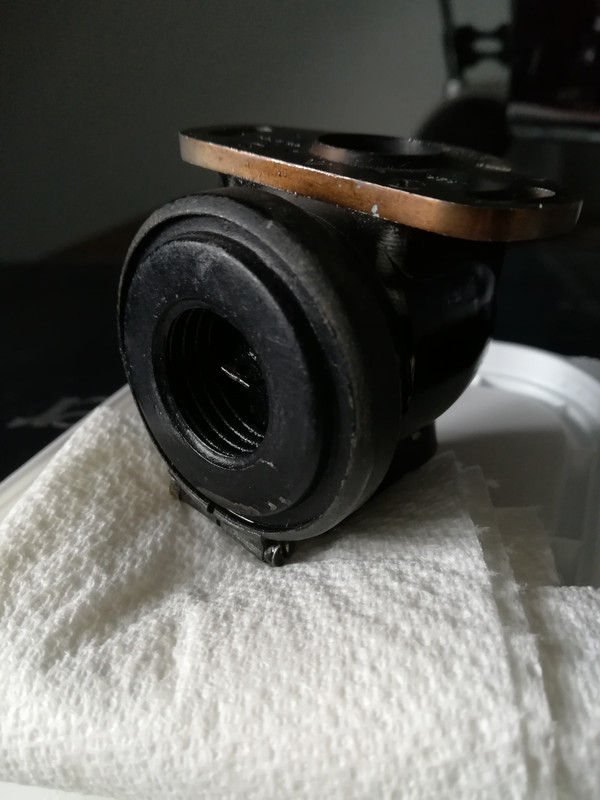
Meanwhile, on the home bench, the E2B compass was reassembled yesterday. They are a really neat little piece of kit...
However the AP was no more helpful than saying it needed refilling with Silicone fluid. Helpful... Being a resourceful chap, I asked around and several sources recommended baby oil as a very good plan B as it is of about the right viscosity and is very neutral so won't damage paint, seals etc. So, off I went to Tesco to be that dodgy bloke stood in the queue with baby oil in his basket (tactically hidden between the beer and the bread) and not a child in sight...
Back home, simply refill compass, seal back up, and leak check...
I then tested the light in it, which didn't work and the red glass dome in it was broken. So I stripped the light off and cleaned all the contact surfaces in it thoroughly, got continuity back, and broke out the brushes to paint the bulb red and the top of the mounting plate black as it had faded over the years being fitted to whatever it was in previously to 788...
This morning's update, it hasn't leaked any so that's another instrument panel widget done and dusted!
It's been a good couple of days for me. I managed to make (I think) my first 2020 visit to someone else's 'toy collection' on Friday, paying a visit to the comparatively local to me Canberra WK124 cockpit restoration guys to pick up some JP wheels and tyres for YAM. It was nice to get a tour of the Canberra and their other projects, socially distant of course, and in the course of chatting we found we were able to help each other. So, yesterday I met up with them again to lend them a couple of my own panels to replicate, and while they were at it they kindly took this lump to paint strip for me!
It had just giggled at the Nitromors, and obviously right now my facilities are limited to what I've got at home, but being in the engineering/fabricating industry getting the panel back to shiny bare metal is nothing to them. It's always good to make links with other groups and try to help each other out; not that everyone in this game seems to appreciate that sadly. So huge thanks to them for doing this favour for me, and thanks for the random goodies!
Meanwhile, on the home bench, the E2B compass was reassembled yesterday. They are a really neat little piece of kit...
However the AP was no more helpful than saying it needed refilling with Silicone fluid. Helpful... Being a resourceful chap, I asked around and several sources recommended baby oil as a very good plan B as it is of about the right viscosity and is very neutral so won't damage paint, seals etc. So, off I went to Tesco to be that dodgy bloke stood in the queue with baby oil in his basket (tactically hidden between the beer and the bread) and not a child in sight...
Back home, simply refill compass, seal back up, and leak check...
I then tested the light in it, which didn't work and the red glass dome in it was broken. So I stripped the light off and cleaned all the contact surfaces in it thoroughly, got continuity back, and broke out the brushes to paint the bulb red and the top of the mounting plate black as it had faded over the years being fitted to whatever it was in previously to 788...
This morning's update, it hasn't leaked any so that's another instrument panel widget done and dusted!
Meteor WS788/ Chippy WK640 Restoration Project, YAM
Shack WR963, Coventry
Other types meddled with by request!
Shack WR963, Coventry
Other types meddled with by request!
Re: A-W Meteor NF.14 WS788 Restoration Project
22/06/2020 Update
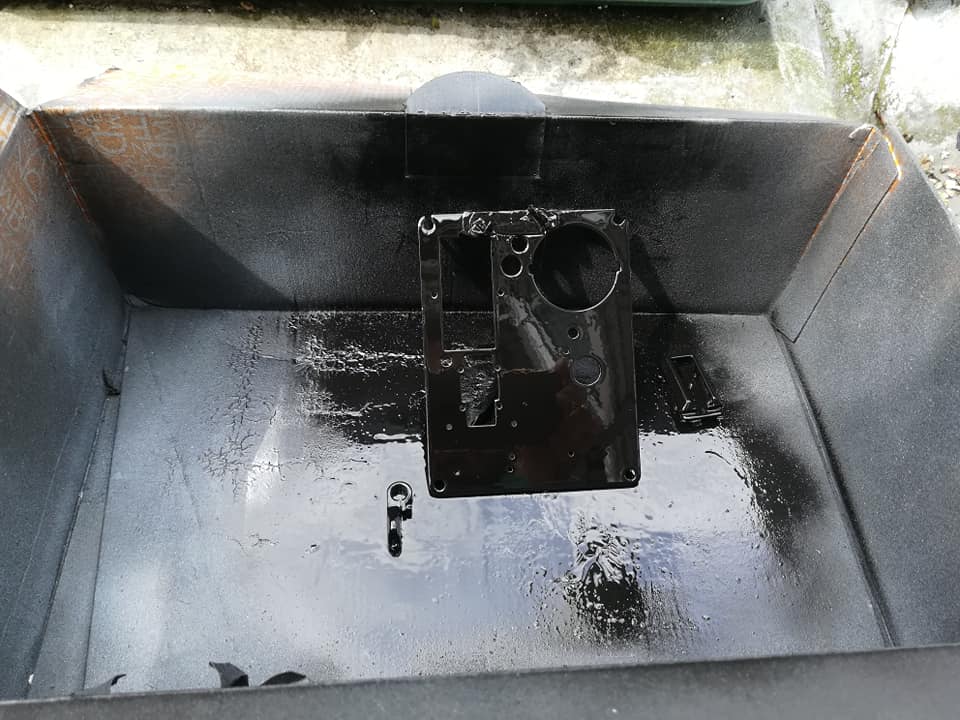
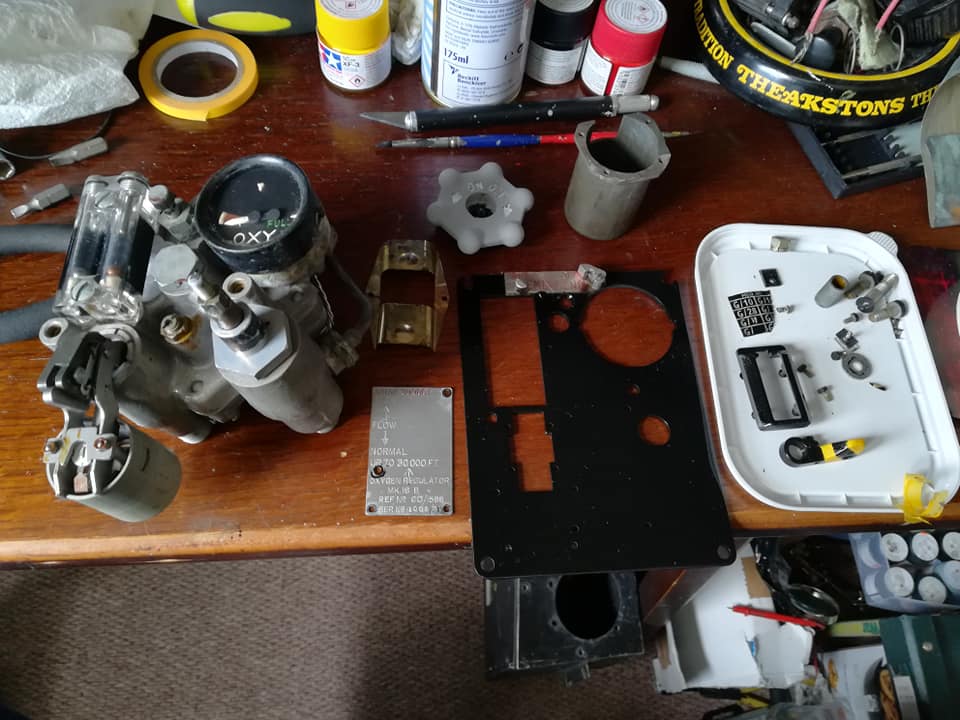
Yesterday it was the turn of the oxygen regulator to receive some attention. This lives on the starboard console of 788's cockpit, and was desperate for some tlc. I decided to strip it down to components, repaint, service as required, and reassemble. The process took all of yesterday, working round drying times, thunderstorms, moving a tree at my parents' house, standard Father's day duties... Anyway, here's the compressed version. The obligatory 'before' shot...
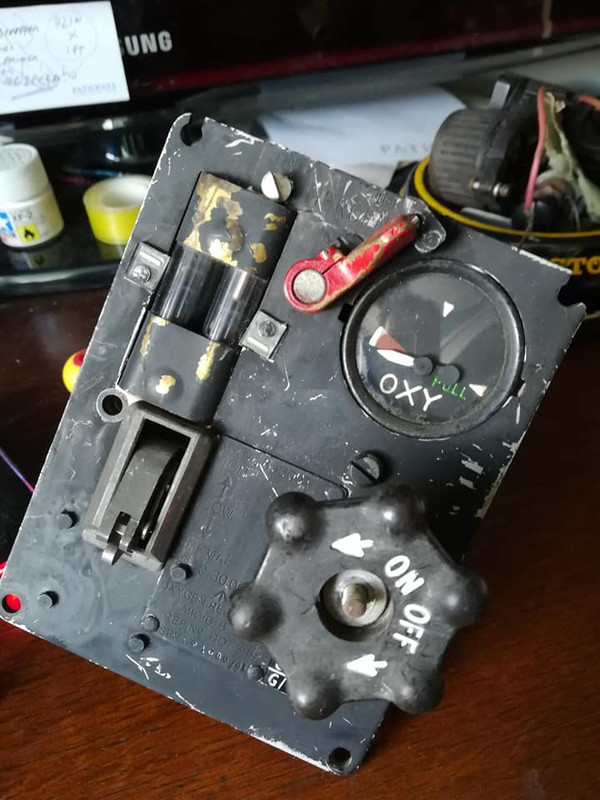
I soon had a kit o' parts
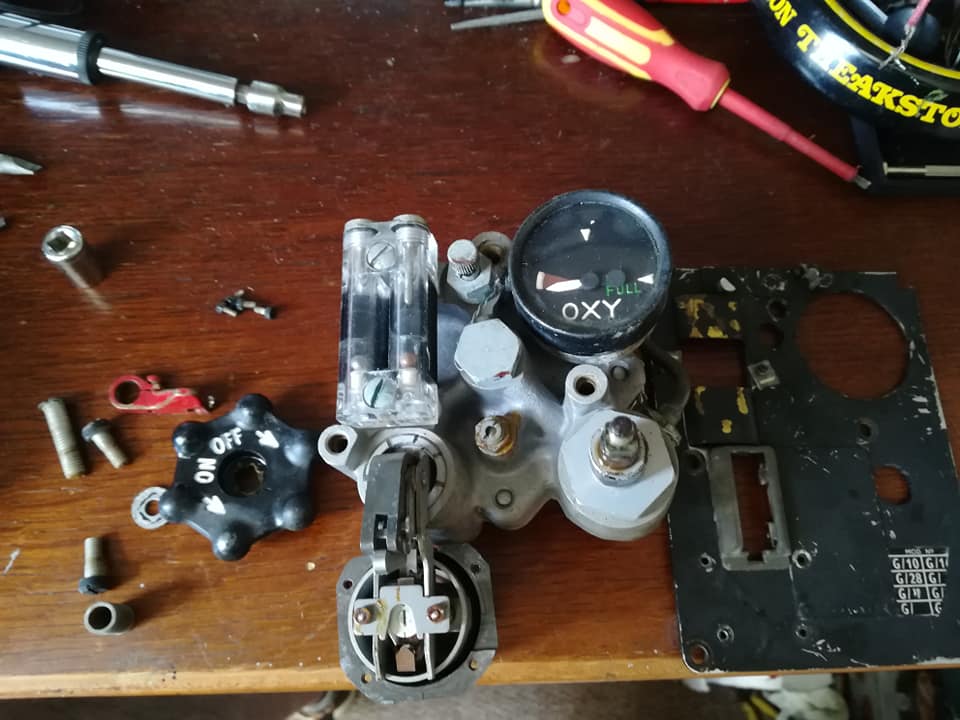
The metal components of which were given a paint stripping. As bad as Nitromors was on the main panel, it was good on this little critter...
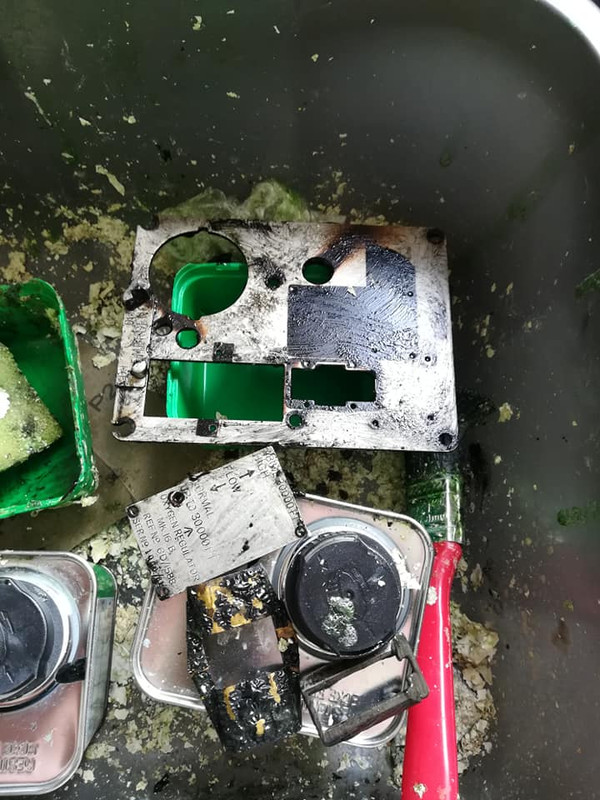
Once again the high-tech spray booth was deployed...
And the kit of parts suddenly looked way happier!
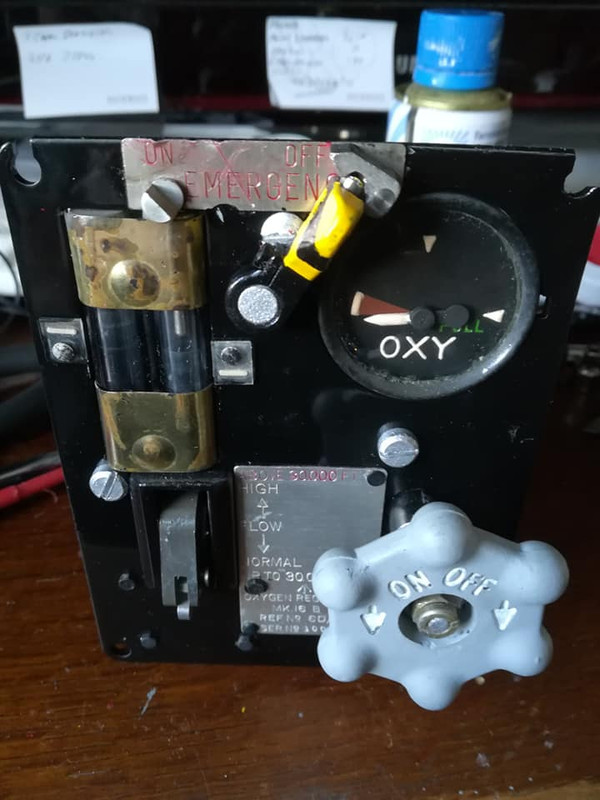
Early evening, I was finally able to get on with reassembly.... and it turned out pretty good!
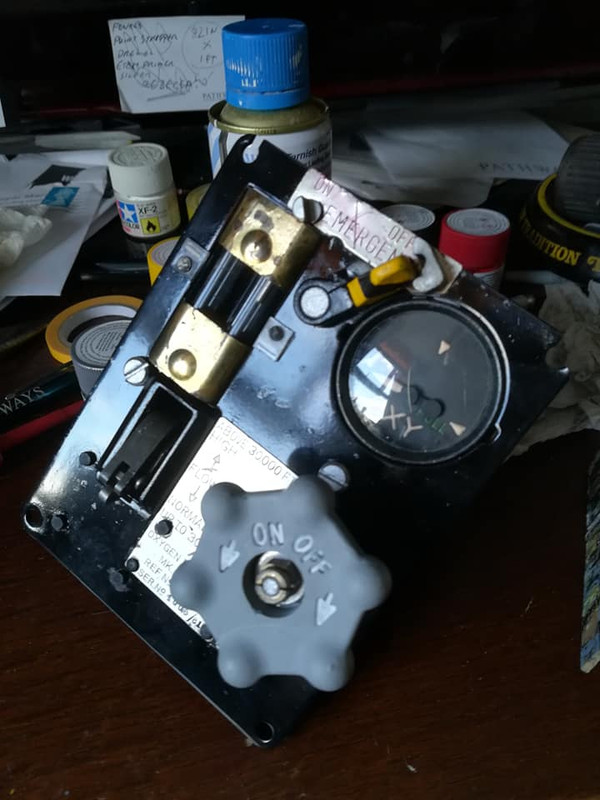
In these 2 shots the sharp eyed among you will spot that the previously seized on-off valve, altitude switch and emergency selector now work happily!
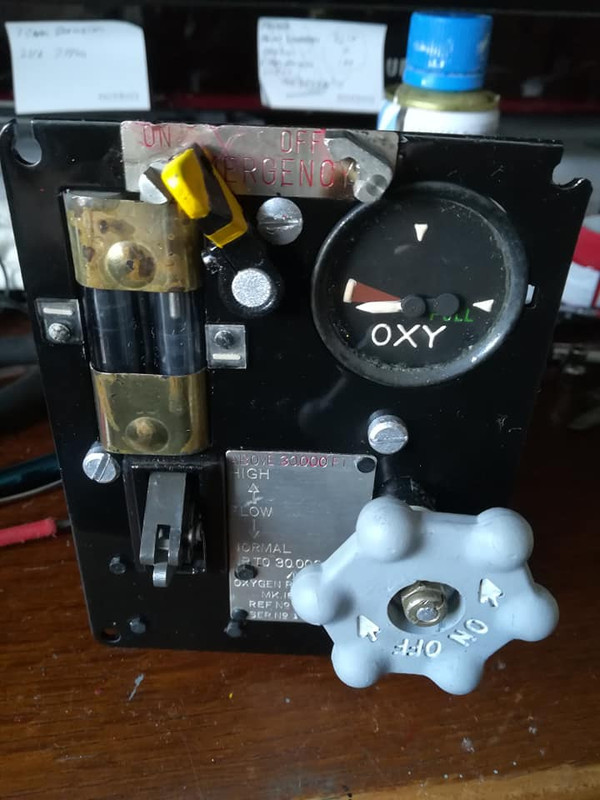
Looks like I really am going to have to wrestle the 2 side consoles out and make them good too...
Yesterday it was the turn of the oxygen regulator to receive some attention. This lives on the starboard console of 788's cockpit, and was desperate for some tlc. I decided to strip it down to components, repaint, service as required, and reassemble. The process took all of yesterday, working round drying times, thunderstorms, moving a tree at my parents' house, standard Father's day duties... Anyway, here's the compressed version. The obligatory 'before' shot...
I soon had a kit o' parts
The metal components of which were given a paint stripping. As bad as Nitromors was on the main panel, it was good on this little critter...
Once again the high-tech spray booth was deployed...
And the kit of parts suddenly looked way happier!
Early evening, I was finally able to get on with reassembly.... and it turned out pretty good!
In these 2 shots the sharp eyed among you will spot that the previously seized on-off valve, altitude switch and emergency selector now work happily!
Looks like I really am going to have to wrestle the 2 side consoles out and make them good too...
Meteor WS788/ Chippy WK640 Restoration Project, YAM
Shack WR963, Coventry
Other types meddled with by request!
Shack WR963, Coventry
Other types meddled with by request!
Re: A-W Meteor NF.14 WS788 Restoration Project
Outstanding work, fella
-
TEXANTOMCAT
- Posts: 358
- Joined: Sat 09 Aug 2014, 5:40 pm
Re: A-W Meteor NF.14 WS788 Restoration Project
What he said!
Re: A-W Meteor NF.14 WS788 Restoration Project
Cheers chaps!
Well I'm afraid I'm a couple of days late with this update... but I think you'll like it. Read on...
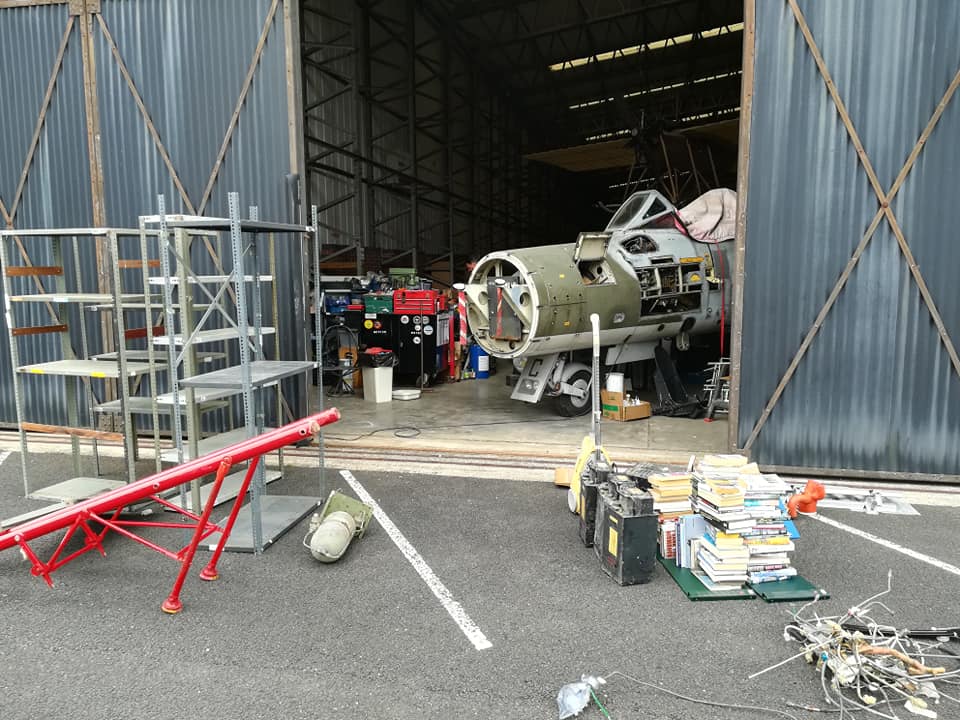
23-24/06/2020 Update... and this is the first update where I bring you pictures from the hangar since March!
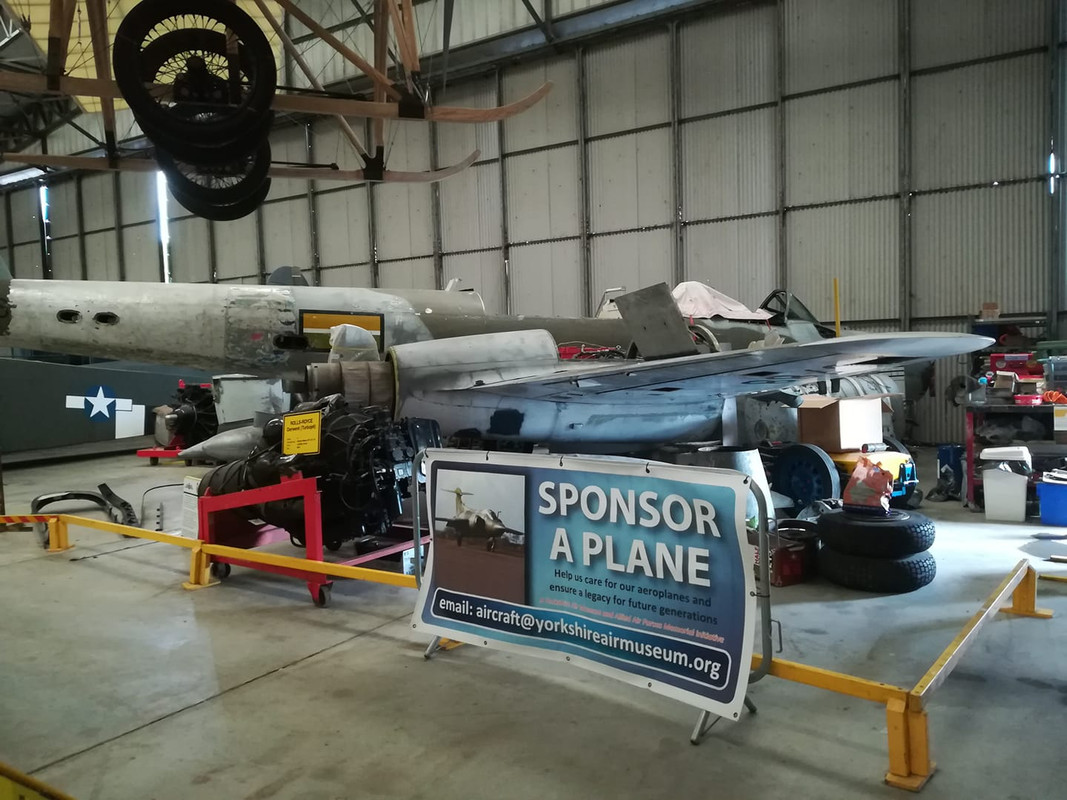
A few of us who are seen to fall in the less vulnerable bracket have been on site, helping get the museum ready for our projected reopening on July 4th. Obviously this means that a lot of exhibits have been needed to be moved, some still do and that's happening today all being well, but the site is looking very different. Being furloughed, I've been involved in this restructuring one day a week, and it's very much helped to keep me sane! It's been good, pitching in and working on other aircraft on site I don't usually get to touch. I think I've dragged my compressor around site to pretty much every aircraft on that site, so much so it has finally given up the ghost, there's been JP mainwheel and tyre acquisitions, collection (cheers Nigel/Canberra WK124 guys!) and swaps, totally flat Tornado tyres to convince back onto rims and to persuade to hold pressure, Anson wings to manhandle, the Anson herself, various airframes, and various cockpits to manhandle into new orientations and positions, Harrier canopy fit, it really has been a mixed bag. So it's been all (non-vulnerable) hands to the pumps to help YAM reopen, and with a few notable exceptions we've all been glad to pitch in and help the place that means so much to us prepare for the Brave New World of post-lockdown reopening.
The good news is, as you can see from the picture above, the Meteor is one of I believe 4 airframes on site included in the museum's "Sponsor A Plane" (yes, I know, a plane is a woodworking tool etc...not my wording) programme, which will hopefully yield us some funding. We are actively looking at merchandise, a little project Rich Woods has undertaken during furlough is t-shirt design which we hope will bring us some cash. We know 788 will never be totally self sufficient, but I figure every £1 we can bring in during these interesting times is £1 less the museum has to find from somewhere. If she goes some way to washing her own face, it makes progress much more viable, without us doing what we do quite a bit and digging in our own pockets. Anyway, this we are discussing with management, and as soon as we get the green light I'll be shamelessly peddling our wares on here and anywhere else I can get people to listen!
So, back to Tuesday. Missions for the day, site jobs, making a start on tidying our corner, and a couple of other jobs thrown in. Like, for example, fitting the newly functional panels I brought back to life a couple of weeks ago to our Dragonfly
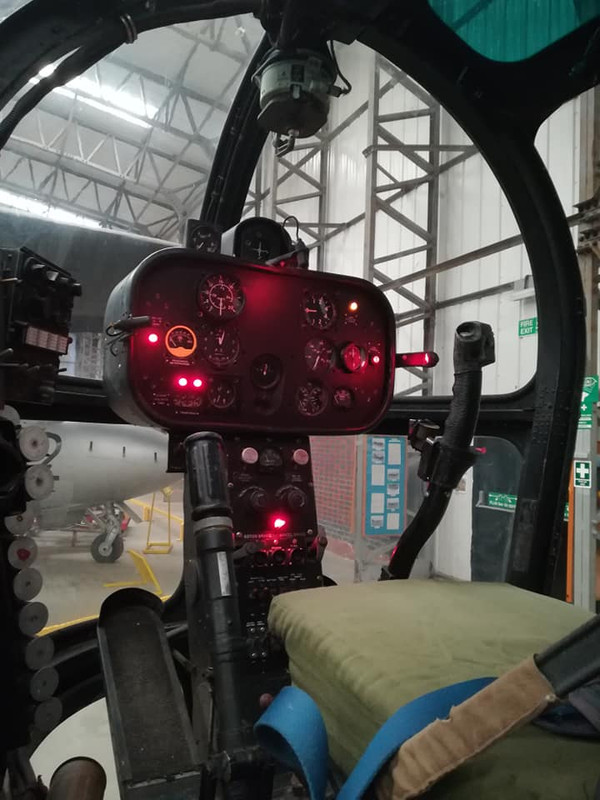
Imagine night shooting her! Especially if my cunning plan to get the nav lights powered off the same source comes to fruition... I like to think old Mac will be looking down on this machine, his pride and joy, and smiling... Though he'll probably be roundly cursing me for using a wrong screw somewhere or some other cardinal sin!
So, tidying... This will continue another day when I have a willing victim, sory volunteer, but I made a start sorting out sundry items. Still packed in its AW packaging, I found this NOS nose panel
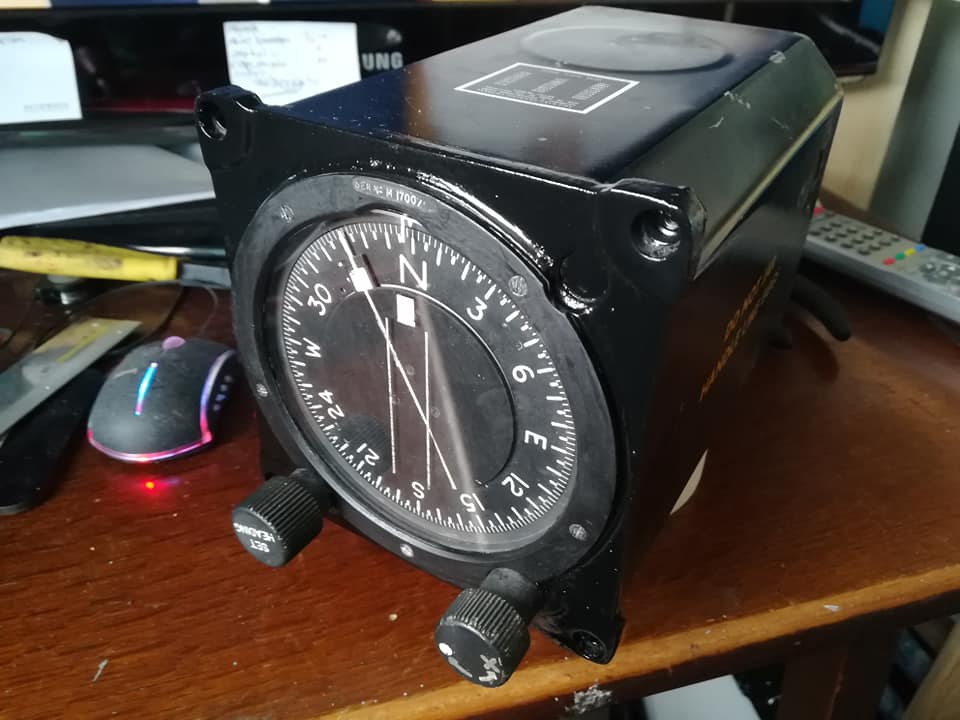
So that'll be getting drilled and used! I also found 788's old master compass, as removed from 788 but in the original packaging the replacement came in.
It's on our disposal list, so if anyone fancies it, let us know...
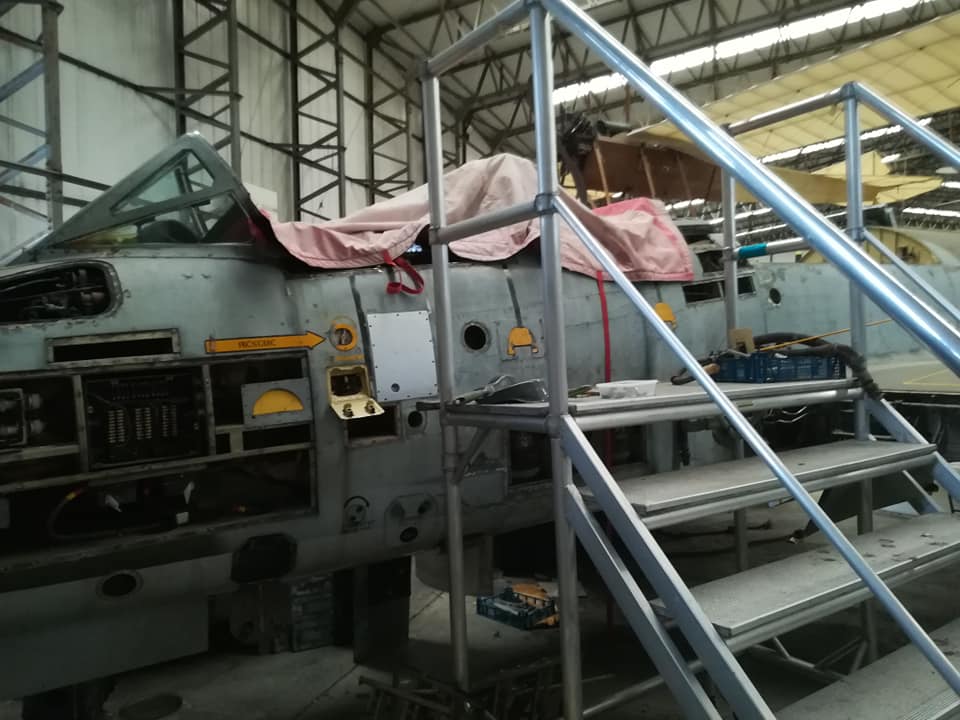
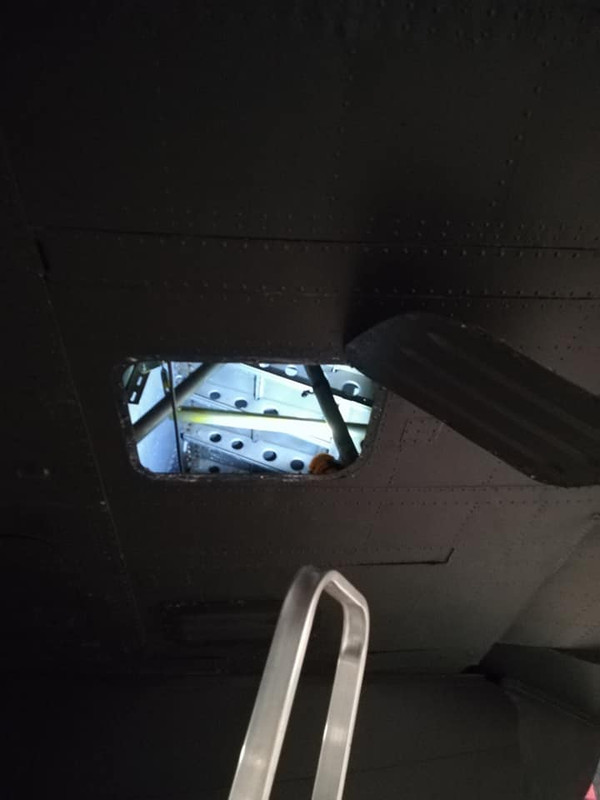
I got called away from tidying to do another job, but not before I was able to take a few pics around 788. Apart from a layer of dust she's no worse off for her sleep. Eerie seeing jobs part done and components and tools sat where they were left 3 months ago...
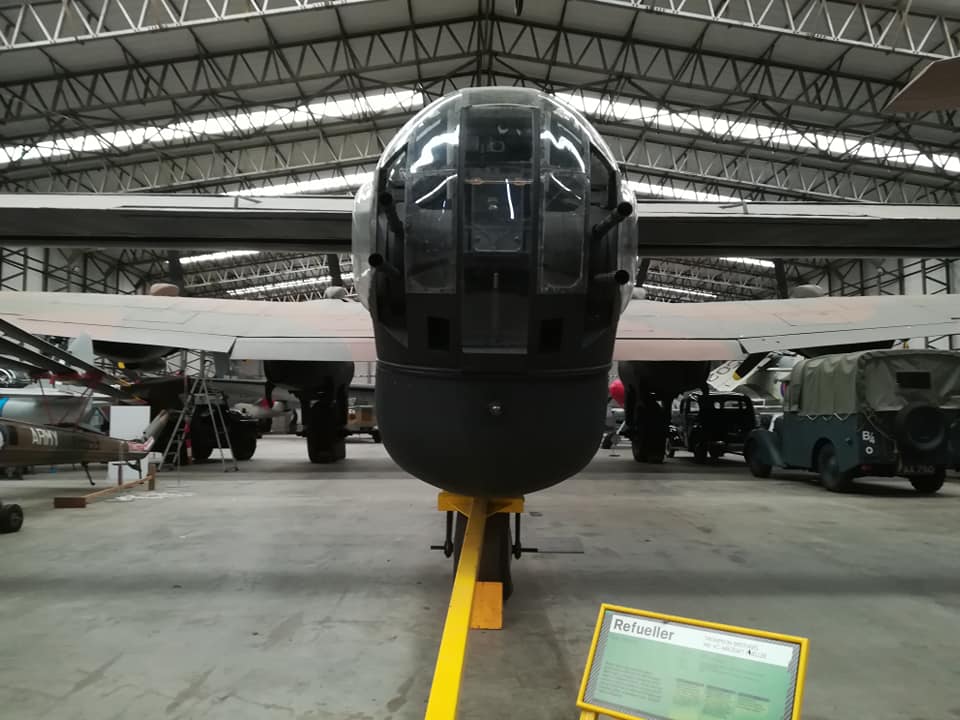
Then I was called away to work on what is probably the jewel in YAM's crown, and the most significant aircraft on site arguably, the Halifax. Part of the move around involves the Hali getting moved right to the front of the hangar, with the prospect of being moved outside on weather-suitable weekends over the summer season. That ought to be quite a draw! Anyway, one of the things that has been not quite right on her in all the time I've been there are the 4 flaps. the port outer and starboard inner have never been attached properly at the control rod end, and dangle around to the extent that visitors may have noticed that years ago the starboard inner was held up with a wooden crutch to save people banging their heads on it! So anyway I spent a good chunk of the very hot afternoon in the very hot wing of the Hali in the very hot hangar, working through these hatches...
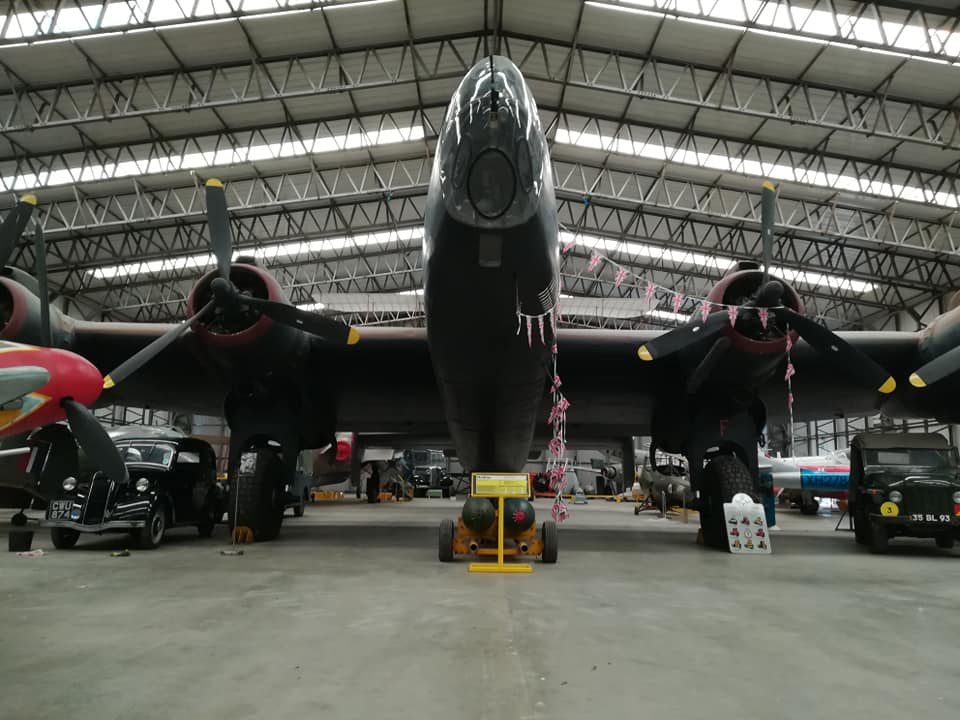
...which really are not designed for a broad shouldered chap! But, I prevailed, and the flaps are now secured and rigged something like symmetrical. We also got the towbar on...
...and not a wooden support in sight!
So that was a busy day. It was good to see Mick and Fletch from the Nimrod team for the first time in months, they put in a good shift cleaning aircraft and walkways in the hangar, and touched up the paintwork on the '109G replica. Always nice to see friendly faces after so long, one thing you appreciate is who your proper mates are and getting to spend appropriately distanced time with them again.
Yesterday I decided to get 788's Mk.3D artificial horizon sorted, and boy did it fight me. St Bruce of GB Air Spares has said he's going to look one out for us, but just in case he doesn't find one I figured we need this one back in good order as a plan B. It's one of the few instruments I don't have the book of words for, so I had to work it out as I went along. The screen needed to come out as it had the same manky internal coating on it the compass had had, and also the face of the instrument needed painting. It's a complex little beast, especially the electric string aspect!
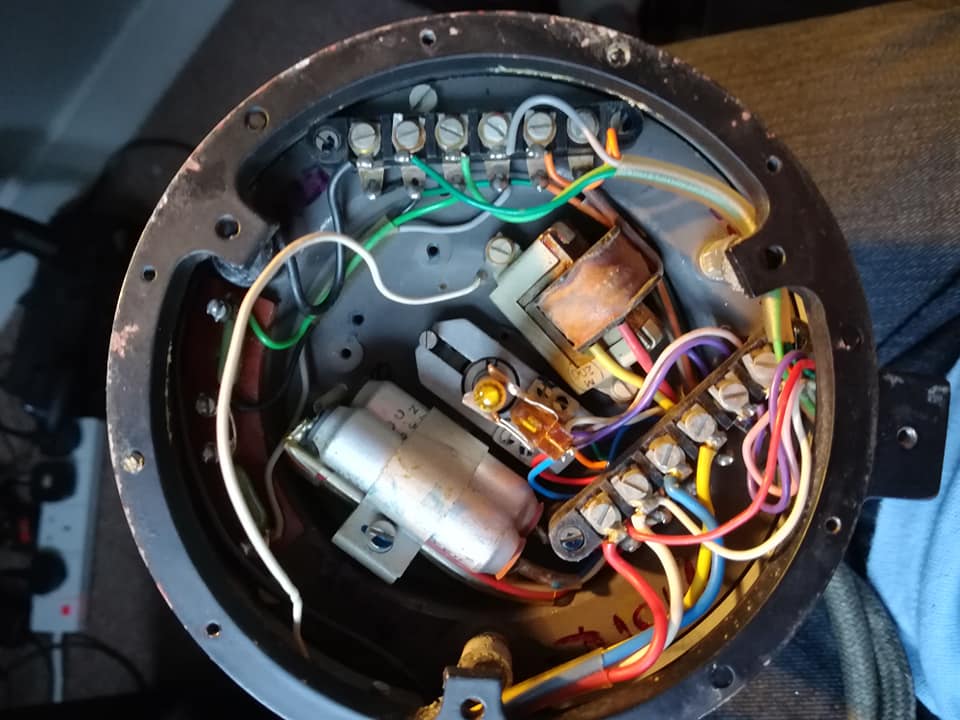
Anyway, in the process of stripping it down, I broke the glass screen
Saved me cleaning it I guess! This left me with a problem as my local motor factors appear to not stock glass for a 1963 Sperry compass. Useless. So I did the right thing, and nicked the glass and front bezel off a Mk.1D I has lying around as, apart from a couple of extra graduations in the glass it's the same. I decided to paint the bezel and the screen in the high tech spray booth, masking rather than removing the glass as I didn't want to break 2 in one day!
After drying the front end reassembled fine
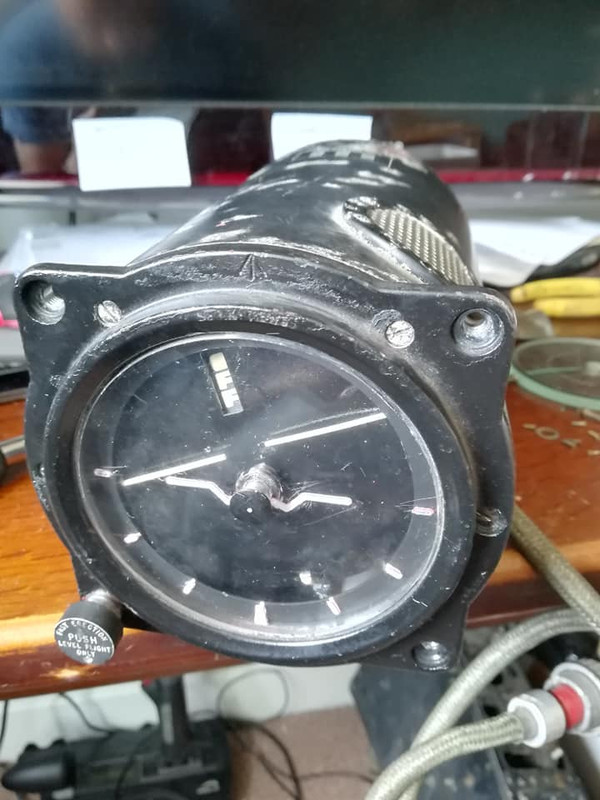
And the electric spaghetti was stuffed back into the rear of the unit
Thankyou Sperry for using colour coded wiring is all I'm going to say! Then... I found I had that little spring left on the bench...
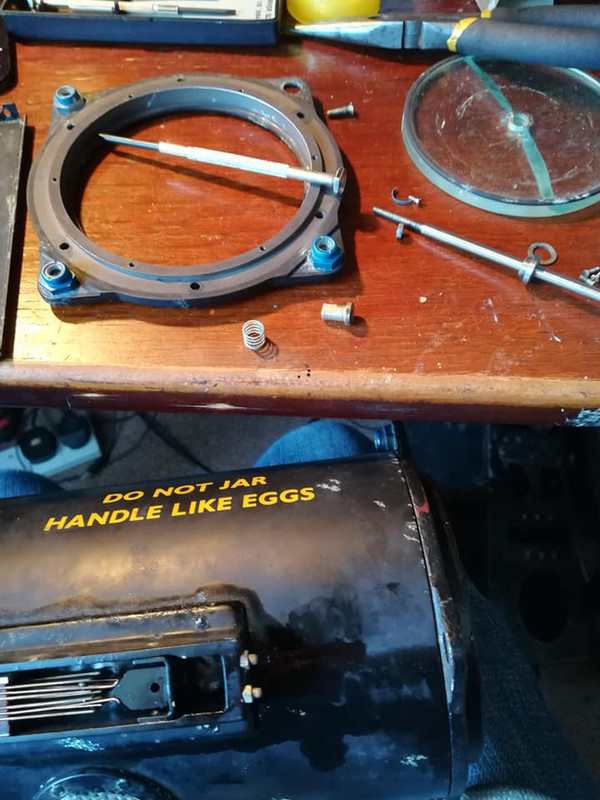
So I had to take the fast erect assembly all apart again to fit it. That was fun... Anyway, I got there in the end, and we have a (hopefully) functional and certainly more presentable Mk.3D plan B.
Hope you enjoyed this update, not just on 788 but the YAM situation in general. It'll be a little while before normal returns, but that normal looks a lot closer to hand now...
Well I'm afraid I'm a couple of days late with this update... but I think you'll like it. Read on...
23-24/06/2020 Update... and this is the first update where I bring you pictures from the hangar since March!
A few of us who are seen to fall in the less vulnerable bracket have been on site, helping get the museum ready for our projected reopening on July 4th. Obviously this means that a lot of exhibits have been needed to be moved, some still do and that's happening today all being well, but the site is looking very different. Being furloughed, I've been involved in this restructuring one day a week, and it's very much helped to keep me sane! It's been good, pitching in and working on other aircraft on site I don't usually get to touch. I think I've dragged my compressor around site to pretty much every aircraft on that site, so much so it has finally given up the ghost, there's been JP mainwheel and tyre acquisitions, collection (cheers Nigel/Canberra WK124 guys!) and swaps, totally flat Tornado tyres to convince back onto rims and to persuade to hold pressure, Anson wings to manhandle, the Anson herself, various airframes, and various cockpits to manhandle into new orientations and positions, Harrier canopy fit, it really has been a mixed bag. So it's been all (non-vulnerable) hands to the pumps to help YAM reopen, and with a few notable exceptions we've all been glad to pitch in and help the place that means so much to us prepare for the Brave New World of post-lockdown reopening.
The good news is, as you can see from the picture above, the Meteor is one of I believe 4 airframes on site included in the museum's "Sponsor A Plane" (yes, I know, a plane is a woodworking tool etc...not my wording) programme, which will hopefully yield us some funding. We are actively looking at merchandise, a little project Rich Woods has undertaken during furlough is t-shirt design which we hope will bring us some cash. We know 788 will never be totally self sufficient, but I figure every £1 we can bring in during these interesting times is £1 less the museum has to find from somewhere. If she goes some way to washing her own face, it makes progress much more viable, without us doing what we do quite a bit and digging in our own pockets. Anyway, this we are discussing with management, and as soon as we get the green light I'll be shamelessly peddling our wares on here and anywhere else I can get people to listen!
So, back to Tuesday. Missions for the day, site jobs, making a start on tidying our corner, and a couple of other jobs thrown in. Like, for example, fitting the newly functional panels I brought back to life a couple of weeks ago to our Dragonfly
Imagine night shooting her! Especially if my cunning plan to get the nav lights powered off the same source comes to fruition... I like to think old Mac will be looking down on this machine, his pride and joy, and smiling... Though he'll probably be roundly cursing me for using a wrong screw somewhere or some other cardinal sin!
So, tidying... This will continue another day when I have a willing victim, sory volunteer, but I made a start sorting out sundry items. Still packed in its AW packaging, I found this NOS nose panel
So that'll be getting drilled and used! I also found 788's old master compass, as removed from 788 but in the original packaging the replacement came in.
It's on our disposal list, so if anyone fancies it, let us know...
I got called away from tidying to do another job, but not before I was able to take a few pics around 788. Apart from a layer of dust she's no worse off for her sleep. Eerie seeing jobs part done and components and tools sat where they were left 3 months ago...
Then I was called away to work on what is probably the jewel in YAM's crown, and the most significant aircraft on site arguably, the Halifax. Part of the move around involves the Hali getting moved right to the front of the hangar, with the prospect of being moved outside on weather-suitable weekends over the summer season. That ought to be quite a draw! Anyway, one of the things that has been not quite right on her in all the time I've been there are the 4 flaps. the port outer and starboard inner have never been attached properly at the control rod end, and dangle around to the extent that visitors may have noticed that years ago the starboard inner was held up with a wooden crutch to save people banging their heads on it! So anyway I spent a good chunk of the very hot afternoon in the very hot wing of the Hali in the very hot hangar, working through these hatches...
...which really are not designed for a broad shouldered chap! But, I prevailed, and the flaps are now secured and rigged something like symmetrical. We also got the towbar on...
...and not a wooden support in sight!
So that was a busy day. It was good to see Mick and Fletch from the Nimrod team for the first time in months, they put in a good shift cleaning aircraft and walkways in the hangar, and touched up the paintwork on the '109G replica. Always nice to see friendly faces after so long, one thing you appreciate is who your proper mates are and getting to spend appropriately distanced time with them again.
Yesterday I decided to get 788's Mk.3D artificial horizon sorted, and boy did it fight me. St Bruce of GB Air Spares has said he's going to look one out for us, but just in case he doesn't find one I figured we need this one back in good order as a plan B. It's one of the few instruments I don't have the book of words for, so I had to work it out as I went along. The screen needed to come out as it had the same manky internal coating on it the compass had had, and also the face of the instrument needed painting. It's a complex little beast, especially the electric string aspect!
Anyway, in the process of stripping it down, I broke the glass screen
Saved me cleaning it I guess! This left me with a problem as my local motor factors appear to not stock glass for a 1963 Sperry compass. Useless. So I did the right thing, and nicked the glass and front bezel off a Mk.1D I has lying around as, apart from a couple of extra graduations in the glass it's the same. I decided to paint the bezel and the screen in the high tech spray booth, masking rather than removing the glass as I didn't want to break 2 in one day!
After drying the front end reassembled fine
And the electric spaghetti was stuffed back into the rear of the unit
Thankyou Sperry for using colour coded wiring is all I'm going to say! Then... I found I had that little spring left on the bench...
So I had to take the fast erect assembly all apart again to fit it. That was fun... Anyway, I got there in the end, and we have a (hopefully) functional and certainly more presentable Mk.3D plan B.
Hope you enjoyed this update, not just on 788 but the YAM situation in general. It'll be a little while before normal returns, but that normal looks a lot closer to hand now...
Meteor WS788/ Chippy WK640 Restoration Project, YAM
Shack WR963, Coventry
Other types meddled with by request!
Shack WR963, Coventry
Other types meddled with by request!
-
TonyC

- Posts: 369
- Joined: Sat 02 Nov 2019, 3:01 pm
- Location: Lost, if you find me, please let me know...
Re: A-W Meteor NF.14 WS788 Restoration Project
I was going to say that, that was a cracking update but then realised that it may have been a pun to far, so wont mention it 
Anyway, it's great to see that life at the Museum, is beginning to return to soon sort of normality, are staff and volunteers allowed onsite regularly now?

Anyway, it's great to see that life at the Museum, is beginning to return to soon sort of normality, are staff and volunteers allowed onsite regularly now?
...and pray that there's intelligent life somewhere up in Space cos there's bugger all down here on Earth!
Re: A-W Meteor NF.14 WS788 Restoration Project
That’s a really nice job on getting the Dragonfly panels working. As much as we all like Meteors, the Dragonfly is a lovely little diversion and a bit different from the norm!
Re: A-W Meteor NF.14 WS788 Restoration Project
Oh dear... yes I was quite grumpy when the glass decided suicide is painless...!
Short answer, no, this is just a little push to get the site re-jigged for the post lockdown world. Once site reopens it'll be minimal essential staff, then as time goes by hopefully more of the engineering side will be allowed back.
WF, glad you like the Dragonfly, I think she looks a bit good!
Meteor WS788/ Chippy WK640 Restoration Project, YAM
Shack WR963, Coventry
Other types meddled with by request!
Shack WR963, Coventry
Other types meddled with by request!
-
PeterVerney
- Posts: 9
- Joined: Tue 07 Jan 2020, 8:05 pm
Re: A-W Meteor NF.14 WS788 Restoration Project
Thanks for this update, nice to see the Halifax get front place, as it always has to take second behind the Lanc, rather like the Hurricane behind the Spit. Anyhow it brought back childhood memories of scrabbling through the crash site of a Halifax for souvenirs, after the RAF had carted most of it away of course. But us kids would salvage anything, unfortunately all lost when my mother cleared out my junk when I left home some years later.
Re: A-W Meteor NF.14 WS788 Restoration Project
Peter, you keep popping up with these little gems; I hope you will commit all these memories to paper sometime!
27/06/2020 Update
After a little flurry of activity, I think this is likely to be the last 'from the hangar' update for a while, As although the museum is still scheduled to reopen on July 4th engineering is still for the time being suspended. I hope this is only a very short term measure while the museum settles into its new post-lockdown regime, as we are dead keen to get back to doing what we love!
Anyway, yesterday. I needed to get my corner of the hangar sorted and tidied ready for visitors to return, which as a working restoration area isn't the easiest of tasks! We had a load of shelving deposited in our corner not long before lockdown ready for use in our new storage/workshop area
 but in the meantime I decided it could be used in our corner 'as is'. A lot of our items are really a 2 person lift, and I needed another able bodied person from our team who knows our kit to come and help me, so I was able to obtain permission for Simon to make his first visit back to the jet since early March. On arrival at the museum, after the paperwork, PPE checks, etc, we were in the hangar which looks very different after Wednesday and Thursday's aircraft movements around site. We did one swap-around, swapping the Skeeter for the Dragonfly so the Dragonfly can sit over a floor mains socket and have its cockpit powered up for the visitors every day, then while Simon made a start moving our stuff outside I was moving engines, missiles etc. in the hangar. I have deliberately not taken any photos of the new layout of the aircraft; you'll have to come see for yourself!
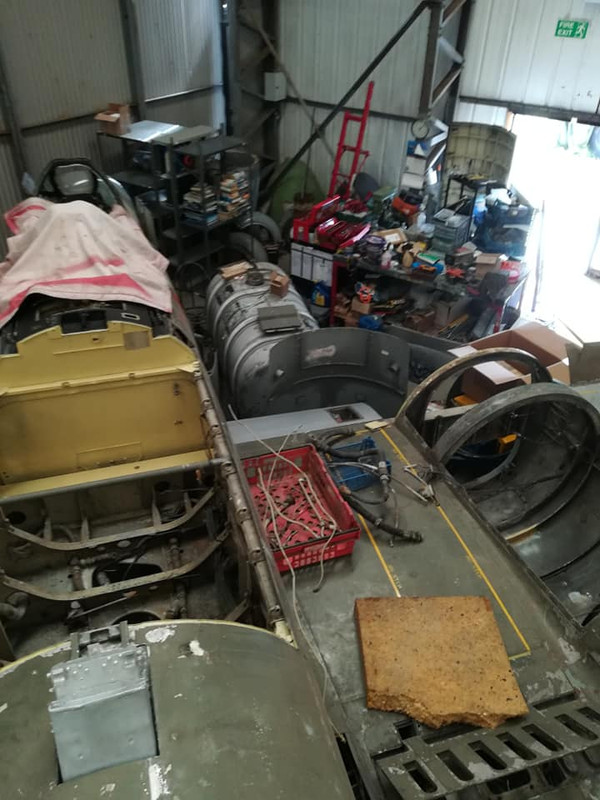
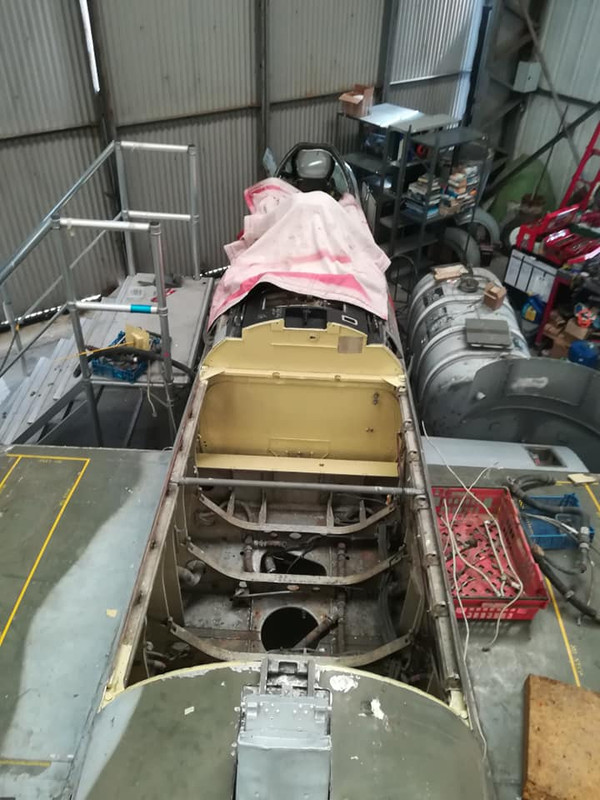
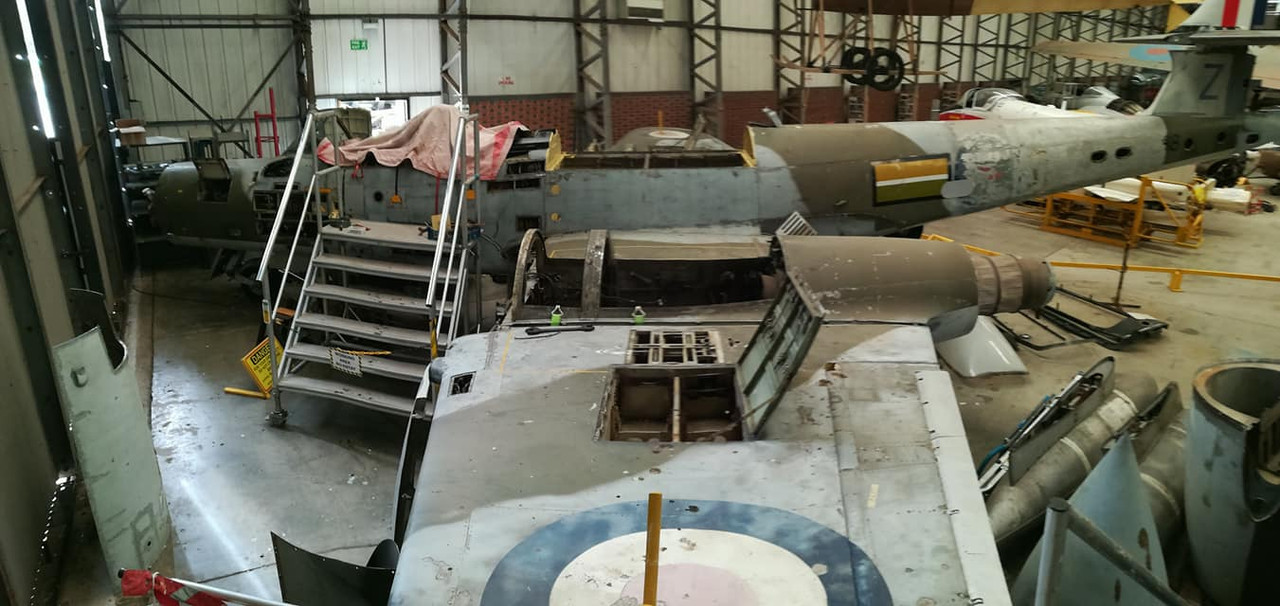
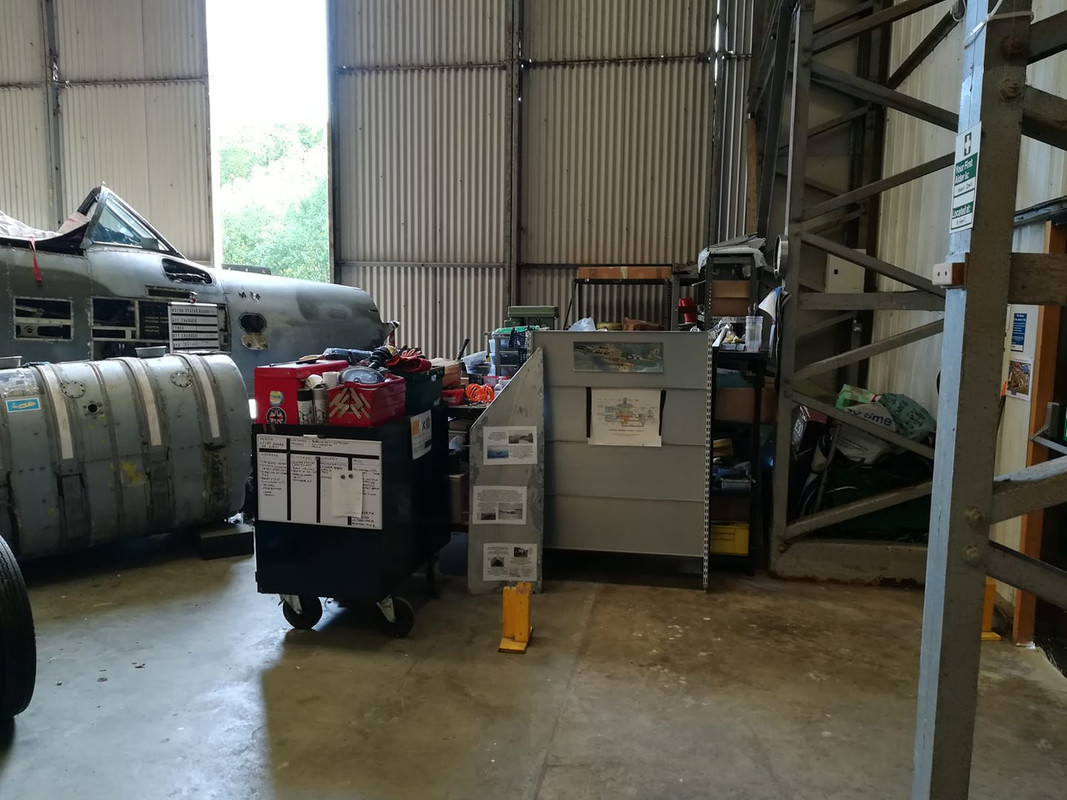
Then, back to the main job, the tidying. I went back to turfing our stuff out of the Naughty Corner. It was nice to see 788 getting some sun on her face for the first time this year as temperatures started to climb...
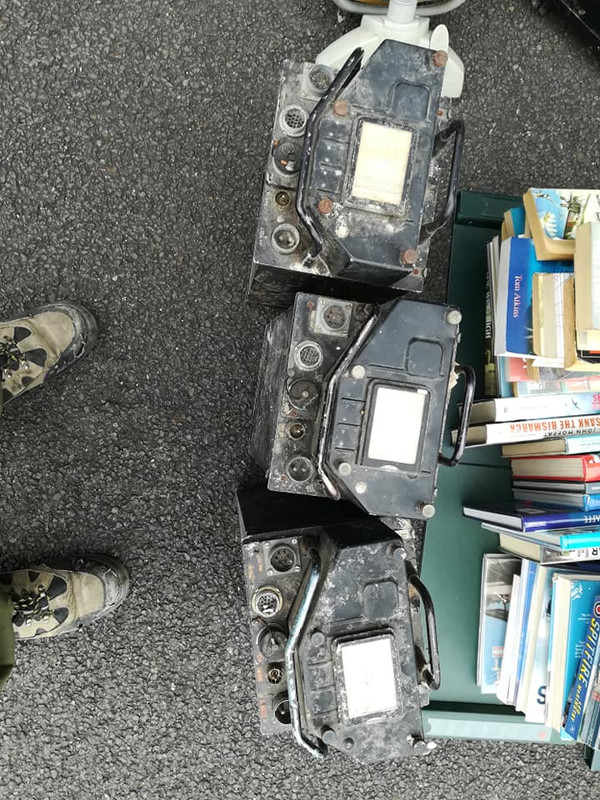
Also, a reminder of some of the unseen kit we have managed to acquire for 788, stuff that won't be seen once she is done but is getting refitted. Like the Gee boxes

And the radio boxes, 2 of which will be fitted to 788. Nice to have the choice!!
A lot of the day was spent sorting just what we have got; 3 months away from the aircraft, you soon start to forget what spares you hold... As the temperatures soared, we moved most of our panels, both intakes, both jetpipe fairings, all the wheels, round to the port front side of the aircraft. this isn't the most practical from a working point of view, but it makes the corner look far tidier. It was a nice reminder for us seeing so many panels painted and ready to refit just how much we have got done! It was also a reminder of just how heavy those brake drums are...
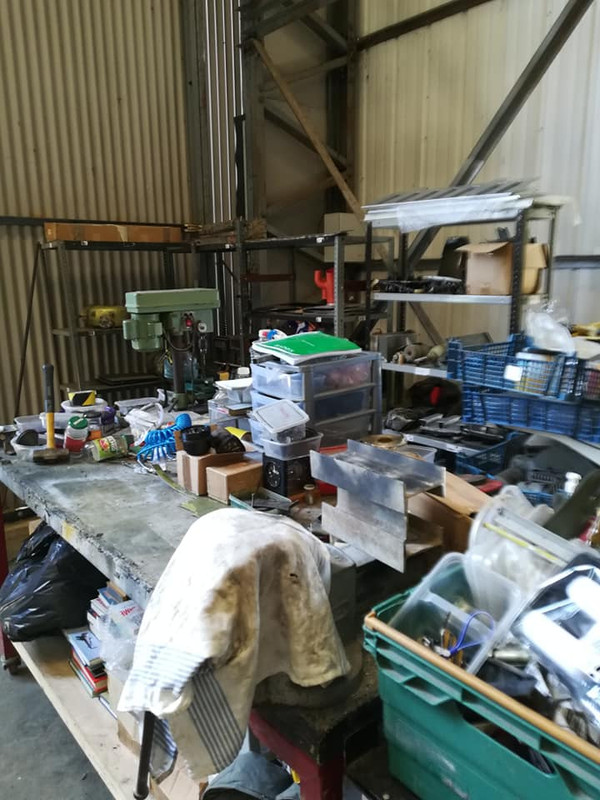
We had been asked to move our shelf units further away from the fire exit, so this we did, then slotting in the new shelves and moving the workbench and tool cupboard around to suit. Everything apart from tools came out from under the bench and was laid out on the shelves, to give us a better idea of what we have and a better chance of actually finding it! the 2nd hand books we have, to hopefully start selling to raise funds for 788 when normality returns, have gone under the bench for now. Once they are moved that'll be the new home for our toolboxes, giving us the top of the tool cupboard back as a second work surface. Flat work surfaces are at a premium! So, cooking gently, we hauled everything back in. In addition I put out on display on the visitor-facing side of 788 some items we have restored, such as the rudder, rear cruciform, to show what we are achieving on the jet. It shows the casual visitor she's more than just a derelict hulk! The spares shelves (and there's still some stuff to return from Area 51) look much better than the previous organised chaos too. Even Simon's epic sweep-athon improved the look of the area greatly!

There is still the top of the bench to sort but that's no big job and we were running out of day, energy, and sweat!
So, a very productive 'last day of school' for us on 788. There will be further updates on homework items, but that's likely it from the hangar until we are allowed back in.
The tidying session did reveal some items we have available to sell or trade; Chuck me a PM if there's anything you need!


Wartime 1154/1155 power units
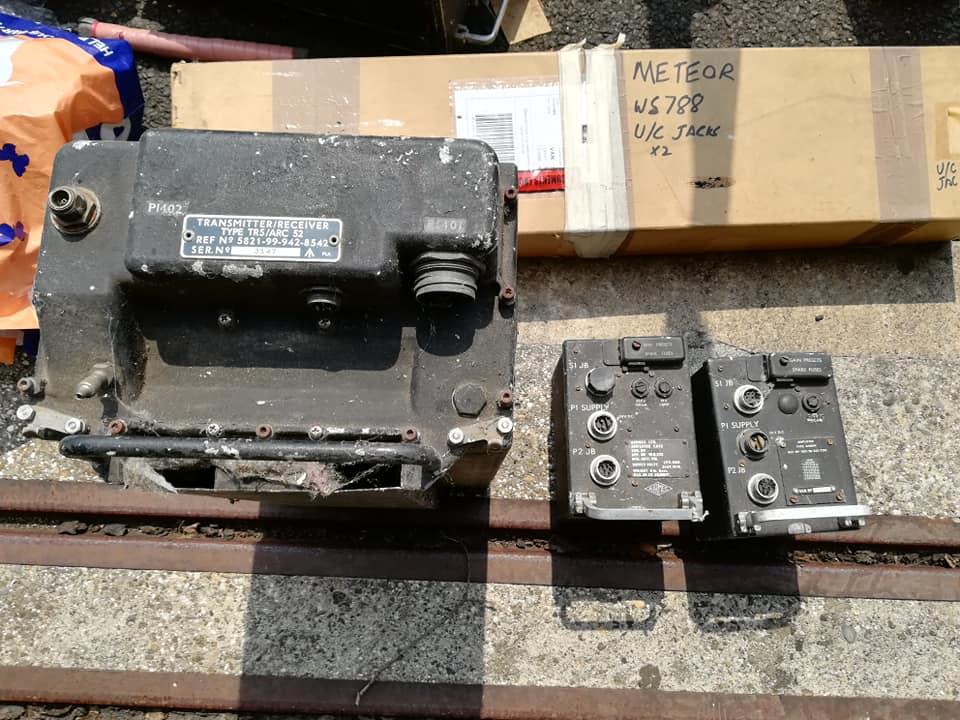
ARC-52 and 2 amplifiers
As we return, and more of the spares stash is sorted properly, there will be more stuff come available I'm sure. Certainly there will be some surplus skin and panel items up for re-homing in exchange for funds towards 788's ongoing restoration!
27/06/2020 Update
After a little flurry of activity, I think this is likely to be the last 'from the hangar' update for a while, As although the museum is still scheduled to reopen on July 4th engineering is still for the time being suspended. I hope this is only a very short term measure while the museum settles into its new post-lockdown regime, as we are dead keen to get back to doing what we love!
Anyway, yesterday. I needed to get my corner of the hangar sorted and tidied ready for visitors to return, which as a working restoration area isn't the easiest of tasks! We had a load of shelving deposited in our corner not long before lockdown ready for use in our new storage/workshop area
 but in the meantime I decided it could be used in our corner 'as is'. A lot of our items are really a 2 person lift, and I needed another able bodied person from our team who knows our kit to come and help me, so I was able to obtain permission for Simon to make his first visit back to the jet since early March. On arrival at the museum, after the paperwork, PPE checks, etc, we were in the hangar which looks very different after Wednesday and Thursday's aircraft movements around site. We did one swap-around, swapping the Skeeter for the Dragonfly so the Dragonfly can sit over a floor mains socket and have its cockpit powered up for the visitors every day, then while Simon made a start moving our stuff outside I was moving engines, missiles etc. in the hangar. I have deliberately not taken any photos of the new layout of the aircraft; you'll have to come see for yourself!
Then, back to the main job, the tidying. I went back to turfing our stuff out of the Naughty Corner. It was nice to see 788 getting some sun on her face for the first time this year as temperatures started to climb...
Also, a reminder of some of the unseen kit we have managed to acquire for 788, stuff that won't be seen once she is done but is getting refitted. Like the Gee boxes
And the radio boxes, 2 of which will be fitted to 788. Nice to have the choice!!
A lot of the day was spent sorting just what we have got; 3 months away from the aircraft, you soon start to forget what spares you hold... As the temperatures soared, we moved most of our panels, both intakes, both jetpipe fairings, all the wheels, round to the port front side of the aircraft. this isn't the most practical from a working point of view, but it makes the corner look far tidier. It was a nice reminder for us seeing so many panels painted and ready to refit just how much we have got done! It was also a reminder of just how heavy those brake drums are...
We had been asked to move our shelf units further away from the fire exit, so this we did, then slotting in the new shelves and moving the workbench and tool cupboard around to suit. Everything apart from tools came out from under the bench and was laid out on the shelves, to give us a better idea of what we have and a better chance of actually finding it! the 2nd hand books we have, to hopefully start selling to raise funds for 788 when normality returns, have gone under the bench for now. Once they are moved that'll be the new home for our toolboxes, giving us the top of the tool cupboard back as a second work surface. Flat work surfaces are at a premium! So, cooking gently, we hauled everything back in. In addition I put out on display on the visitor-facing side of 788 some items we have restored, such as the rudder, rear cruciform, to show what we are achieving on the jet. It shows the casual visitor she's more than just a derelict hulk! The spares shelves (and there's still some stuff to return from Area 51) look much better than the previous organised chaos too. Even Simon's epic sweep-athon improved the look of the area greatly!
There is still the top of the bench to sort but that's no big job and we were running out of day, energy, and sweat!
So, a very productive 'last day of school' for us on 788. There will be further updates on homework items, but that's likely it from the hangar until we are allowed back in.
The tidying session did reveal some items we have available to sell or trade; Chuck me a PM if there's anything you need!
Wartime 1154/1155 power units
ARC-52 and 2 amplifiers
As we return, and more of the spares stash is sorted properly, there will be more stuff come available I'm sure. Certainly there will be some surplus skin and panel items up for re-homing in exchange for funds towards 788's ongoing restoration!
Meteor WS788/ Chippy WK640 Restoration Project, YAM
Shack WR963, Coventry
Other types meddled with by request!
Shack WR963, Coventry
Other types meddled with by request!
Re: A-W Meteor NF.14 WS788 Restoration Project
Just a little, subtle reminder; big day tomorrow for YAM, as the doors reopen to visitors...
https://yorkshireairmuseum.org/plan-you ... formation/
https://yorkshireairmuseum.org/plan-you ... formation/
Meteor WS788/ Chippy WK640 Restoration Project, YAM
Shack WR963, Coventry
Other types meddled with by request!
Shack WR963, Coventry
Other types meddled with by request!
Re: A-W Meteor NF.14 WS788 Restoration Project
It's a tad far, I shall console myself with a trip to Estrella on Thursday. It doesn't hurt that there are also 100+ wineries, 10 distilleries, several breweries & a chocolate factory within 12 miles of the placeBlue_2 wrote: ↑Fri 03 Jul 2020, 4:17 amJust a little, subtle reminder; big day tomorrow for YAM, as the doors reopen to visitors...
https://yorkshireairmuseum.org/plan-you ... formation/